Batching Cocktails

A few years ago, when I just getting into craft cocktails, I enrolled in an online bartender training program called BarSmarts. BarSmarts is a decent primer on distillation, spirits, and basic bartending techniques. I found it worth my time, even if I was a bit turned off by the obvious branding bias for Pernod Ricard products (Pernod created and runs the program). For those who graduate from the online course, Pernod offers a physical, traveling seminar series called BarSmarts Advanced in which industry veterans like Dale Degroff and David Wondrich travel from city to city and (supposedly) offer practical pointers on running a bar, advanced spirit identification and tasting techniques, and more in-depth content than that offered by the online course. My experience with BarSmarts Advanced was very disappointing. Very little of the seminar is devoted to practical learning, it’s mostly just a vehicle for the old timers to tell a few war stories of their time behind the stick and a way for Pernod Ricard to fleece you out of $75.

One of the not completely useless moments in the day was a question and answer session with the assembled panel. There were some legitimately good questions asked by my peers in the industry, many of which no doubt would have been addressed already had the seminar contained any meaningful content. One question, in particular, sticks out in my mind even today. A young man from the audience asked what roll, if any, batched cocktails should play in a bar program. It was interesting that all three of the panelists who answered were against pre-batching cocktails. They had various justifications for their stance but basically the animus was centered on the idea that it removes the technical expertise required of bartenders. Whether or not that’s true, its a pretty stupid reason for not using batches in your bar. Read on to find out why batching makes sense and how you can use it to increase guest satisfaction, lower costs, and drive profits.

Batched Cocktail Primer

When we talk about batching cocktails what we are describing is the process of combining the shelf stable ingredients in a given recipe together in a large mixing vessel, usually in large volumes and in fixed proportions that mirror those of the original cocktail. In my bar, I limit my definition of shelf-stable ingredients to commercially bottled spirits and liqueurs, bitters, and syrups that do not contain fruit. I’ll include fortified wines in batches if the overall ABV of the final batch will be over 24% (which is usually the case). I’ll include syrups that contain fruit (such as our house-made grenadine) if the overall ABV of the final batch is over 30%*. Cocktails can be batched in their entirety, or, for those cocktails that include citrus or cream, the shelf stable ingredients can be batched together and the mixers can be added to order. Take the Corpse Reviver #2, for example. I can batch the three shelf stable ingredients—gin, Cointreau, and Lillet Blanc—and add the lemon juice to order (I add the absinthe as a rinse to order as well).

To Batch or Not to Batch

Not every cocktail can—or should—be batched. Deciding which cocktails to batch is a balancing act between efficiency in the well while making drinks and efficiency in prep. Basically my decision to batch comes down to four things, how many bottles will I effectively remove from the well, how much money will I likely save, how much time will I save, and how much forgiveness does the cocktail have for flavor when free-poured. All four of these considerations relate directly to guest satisfaction. 

The first one is an easy one, I have a finite amount of room for bottles in my service wells, and with 34 cocktails on each of my menus, I need to use that space as efficiently as possible. If a batch calls for four different spirituous ingredients, condensing them all into a single bottle potentially saves me three bottles worth of space. This allows me to fit more ingredients into each well and have a more diverse menu as well. More on this—and how a diverse menu leads to guest satisfaction—below. If a batch only calls for two ingredients, one of which is already in the well, then batching it doesn’t save me any space. 

This leads to the second consideration, pour cost. I rarely batch only two ingredients together but if I have an expensive ingredient in a cocktail, I may batch the drink to reduce my pour costs, even if there are only two ingredients in the batch. I talk about this below. Lower costs allows me to keep our prices low, which increases guest satisfaction. On the other hand, batching two ingredients increases prep time and takes up storage space, so it may not be worth it if your cost savings on the batch is negligible.

Third, does it save my bartender’s time? The more complex the drink, the longer an unbatched version of it will take to properly construct, and the more time my bartenders save when using a batch. The faster my bartenders can make drinks, the faster our guests will receive them, which leads directly to guest satisfaction. I get into more detail on this below.

And finally, does the cocktail offer forgiveness when free-poured? We have a culture of free pouring many of our drinks. This may shock a lot of craft bartending purists but the reality is that free-pouring is a skill that can be learned like any other, and it can save you a ton of time in the well so your guests get their drinks faster. That said, some cocktails are more forgiving of slight (+/- ⅛) oz discrepancies in the recipe than others. If a cocktail is so noticeably off balance with slight errors in pour size that a guest would notice, I’m more likely to batch it.

Benefits of Batching

Increase Service Speed
One of the main benefits of batching complex cocktails is that service speed can be increased. I work in a large craft cocktail bar with 126 seats (103 of which are serviced by a single well). On a normal weekend night, the service well bartender makes an average of 736 drinks. We have several ways of managing that kind of volume efficiently, including the use of magnetic stir plates, a separate printer for wine and beer that is serviced by the barbacks, and two other wells used to service the guests sitting at the bar—the bartenders working those wells swing over to the service well and help out whenever they can. But it is an intense shift for the service well bartender who basically never stops making drinks from open to last call. One thing that saves a ton of time is having batches in the wells. Instead of having to pick up and measure out three or four spirits, a syrup, and two different bottles of bitters for a single cocktail, the bartender can simply measure out the full volume of the batch and be done with it. It’s a huge time saver that ensures our guests get their drinks as fast as possible, which makes them happier and more likely to return.

Increase Drink Consistency
Another benefit of batching is the fact that, because the ratios for a given drink are fixed in the bottle, it increases the consistency from one drink to the next. When dealing with small amounts like ¼ oz, it’s fairly easy for a bartender to accidentally overpour, especially when they’re moving fast. Having all your shelf stable ingredients pour out of the bottle at the same ratio means one measurement is all that’s needed to ensure that the shelf-stable components of a drink are balanced. More consistent drinks from one bartender to another, and from one drink to another by the same bartender, is another great way to increase guest satisfaction, and another huge benefit of batching.

Increase Menu Variety
My service wells have enough space to store 42 bottles. That sounds like a lot, but it’s amazing how quickly that space fills up when my average cocktail menu has 34 drinks on it. Some of those drinks might have five or six different shelf-stable ingredients in them. Without batching, it would be impossible for me to fit all the necessary ingredients into a well and still offer our guests the kind of diverse and deep menu our bar is known for. Consolidating three, four, or five different bottles into one is an obvious way of packing more ingredients into each well, allowing me free reign to add whatever I want to a menu, and making more of our guests happy about finding a cocktail that feels designed just for them.

Decrease Pour Costs
Batching cocktails reduces pour costs for three interrelated reasons. 

First, it reduces the chances that your bartenders will overpour, both with respect to the individual ingredients within the recipe, and for the cocktail as a whole. For example, the Vieux Carré, a classic cocktail from New Orleans, requires 4 different spirituous ingredients and two different bottles of bitters. When measuring each of the spirits out individually it’s possible for a bartender to overpour any one—or multiple—of them. That’s four chances for a bartender working quickly to overpour slightly. It’s simple to do, especially when measuring scant volumes like ¼ ounce or even ½ ounce. The cost of even a 1/16 ounce overpour on one ingredient adds up when you’re making hundreds of cocktails a night, tens of thousands of cocktails per year. Over-pouring multiple ingredients (which heavy-fisted bartenders frequently do, compounds the cost even more and can throw the drink out of balance, resulting in a potential No-Like and a send back.

This leads us to the second way batches reduce pour costs: increasing consistency reduces send backs, this in turn reduces our “spillage” totals, which in turn reduces our overall pour costs. 

Third, even if your bartenders do overpour slightly, the average cost to the bar of that overpour is reduced with a batch because the more expensive ingredients are mixed in with the cheaper ingredients. Let me give you a hypothetical example. 

To set the stage, let’s pretend that a simple recipe calls for ½ ounce of Green Chartreuse and 1¼ ounces of well gin for the alcoholic ingredients (the non-alcoholic ingredients are not important). At the bar I run, I buy our well gin in ten-case drops, which allows me to realize steep discounts on the price down to $9.99/liter ($0.30/ounce). Buying Green Chartreuse by the case gets the price of a 750 mL bottle down to $48.49 ($1.91/ounce). If we were to batch these two ingredients into a single bottle, the cost per ounce of the batch, to the bar, would be $0.76. 

So, a bartender working without a batch who accidentally overpours the Green Chartreuse by ⅛ of an ounce costs the bar $0.24. Conversely, that same bartender accidentally overpouring the batch by ⅛ of an ounce costs the bar only $0.10. “But what if the bartender overpours the gin instead of the Green Chartreuse in our unbatched version of the drink,” you may ask? “In that situation the ⅛ ounce overpour costs the bar only $0.04.” It’s true, in this scenario, overpouring the batch costs the bar more than an unbatched cocktail would have cost. There are three reasons that the batch will still save you money in the long run, but I’m going to save that for another post because this one is already going to be way too long. 

I know talking in terms of savings of cents on the dollar may not seem like it’s worth it, but at a high-volume establishment making over 100,000 cocktails a year, those cents add up fast. I estimate that batching cocktails saves our bar around $11,750/year on costs eliminated by reducing overpouring (I’ll talk about how I calculate that figure in another post as well).

How to Calculate Batch Recipes

Now that we’ve covered the reasons for using batched cocktails in your bar, let’s get into the nitty gritty of how to do it properly. Calculating batch recipes isn’t difficult at all, but there are a few best practices that I’ve developed over time. The main thing to remember is that the batch has the exact same proportions as the original cocktail.

In America, most drink recipes are listed in fractions of imperial ounces, but bottles come in metric volumes of 750 mL or 1 liter. This could make for some tedious conversions between the two systems, but fortunately, the math is not necessary as all that matters is the proportions of one ingredient to another. Take a modern classic, the Black Manhattan, as a simple example. A fairly typical recipe (excluding the bitters) would be 2 ounces of bourbon and 1 ounce of Averna. Scaling up using a simple ratio of 1 ounce = 1 liter, our batch recipe would be 2 liters of bourbon and 1 liter of Averna. Scaling up further to maximize the size of a batch that will fit into one of our batch containers, our full recipe would be 14 liters of bourbon and 7 liters of Averna. This batch recipe is convenient for my bartenders who will be making the batch during their prep shift, as I get both our well bourbon and Averna from our distributors in liter bottles.

To minimize prep time spent on batches, I tend to calculate my batch recipes to be as large as possible but I’ve learned that maximizing the size of the batch isn’t nearly as important as making it easy to construct. This means that if a given recipe requires an ingredient that only comes in 750 mL bottles, I’ll try to create the recipe so that that ingredient is called for in a multiple of 750 mL. Take the Corpse Reviver #2 for example, a recipe that maximizes the size of the batch that would fit into one of our batch containers would be 7 liters of each ingredient, but because Lillet Blanc only comes in 750 mL bottles, I cap each ingredient at 6 liters (750 mL x 8 bottles = 6 liters). This makes each batch faster to construct and less prone to errors during construction, as well as making ordering and inventory easier for me.

The process for creating a batch recipe is pretty simple. Start by figuring out the ratios of your ingredients. Decide on a baseline ingredient. Scale up to maximize your batch size. Resize batch if needed to ease construction. Calculate bitters volume. Publish the recipe in your BRM.

Batched cocktail design work flow

Batched cocktail design work flow

To make the following example more useful, I’m going to modify a classic cocktail recipe for the Vieux Carré to make it more complicated. We’ll use the following recipe:

Rye 1¼ oz, Cognac 1 oz, Sweet Vermouth ¾ oz, Benedictine ½ oz, Peychaud’s Bitters 3 dashes, Angostura Bitters 2 dashes

The first step is to establish the lowest common denominator (excluding the bitters). Here, we see that all of these ingredients can be broken down into ¼ oz parts. This lowest common denominator becomes the basis from which all the remaining volumes will be calculated. If we set ¼ oz equal to 1 liter, we get the following bitterless batch recipe:

Rye 5 liters, Cognac 4 liters, Sweet Vermouth 3 liters, and Benedictine 2 liters

This gives me a total batch size of 14 liters plus the volume of the bitters I still need to calculate. The recipe would work just fine, but for my purposes, I want to tweak it a bit to increase the overall batch size and also to better account for the size of the bottles I’m using in the batch. I get rye and cognac in 750 mL bottles and sweet vermouth and benedictine in liter bottles. That means for the current recipe I need 6⅔ bottles of rye and 5⅓ bottles of cognac.

I usually estimate my max batch size at around 21 liters, so I could potentially increase the batch size by up to 50%. If I reset ¼ oz to 1500 mL, my new batch recipe would be:

Rye 7500 mL, Cognac 6 liters, Sweet Vermouth 4500 mL, and Benedictine 3 liters

I like this recipe better because it maximizes the size of the batch I can fit into one of my batch containers and because it means that I have a partial bottle on only one ingredient instead of two, making it easier for my bartenders to construct and making it less likely that an error will be made when constructing a batch.

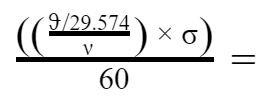
The final step in determining a batch recipe is to calculate the amount of bitters to include in the batch. This is a major hangup for a lot of people because normally the volume of bitters in a given cocktail is so small that they don’t know where to start when trying to figure out how to scale it up. For the longest time, I took a trial and error approach to this as well but in the last several years I’ve figured out a better way. My revelation came from determining the number of dashes of bitters in an ounce. Through dozens of tests I determined that the average number of dashes in an ounce is 60. This gave me the following equation to calculate the volume of bitters in a batch. Here, ϑ is the total volume of the batch in milliliters, excluding bitters, 29.574 is a conversion factor to convert from metric milliliters to imperial ounces, ν is the volume of the batch that is in a single cocktail, in ounces, σ is the number of dashes of bitters in each cocktail, and 60 is the number of dashes of bitters in an ounce.

Bitters Batch Equation.JPG

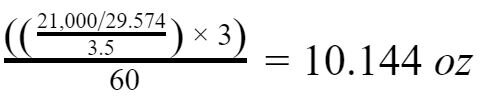
So, let’s calculate the amount of Peychaud’s bitters required for our batched Vieux Carré above. Our total batch volume is 21,000 milliliters and the volume of the batch required for each cocktail is 3½ oz. This gives us a required volume of 10.144 oz of Peychaud’s bitters. I usually round down to the nearest ⅛ of an ounce, giving me a total required volume of Peychaud’s bitters of 10⅛ oz. The amount of Angostura bitters required in the batch is ⅔ that of the Peychaud’s, giving me a total required volume of Angostura bitters of 6¾ oz.

Bitters Batch Equation Calculation.JPG

To make it easier to calculate bitters volumes in batches, I’ve made an excel spreadsheet, which I’ve converted into an online calculator for you to use for all your batching needs. I hope you find it useful.

Calculating Batch ABV

I don’t always calculate a batch’s ABV but if I’m ever concerned that an ingredient I’m including in a batch may spoil, I double check to make sure that the ABV is high enough to limit bacterial growth. Double checking batch ABV, coupled with proper batch storage (see below) and proper product rotation procedures (see this post), ensures that the drinks I’m serving my guests are not only delicious, but also fresh and safe to consume.

Calculating a batch’s ABV is simple to do. You simply multiply the volume of each of your ingredients by their respective alcohol content (ABV) expressed as a fraction (i.e. 35% ABV = 0.35), add those numbers up and then divide the sum by the total volume of the batch. Then multiply the result by 100 to get a value expressed as a percentage. If that didn’t make sense, perhaps this equation will help. Here, υ represents the volume of a given ingredient, ρ represents the fractional ABV, and Λ represents the total volume of the batch.

Batch ABV equation.JPG

Take a classic cocktail, the Mexican Firing Squad, as an example. Although this cocktail is too simple to bother batching at my bar, for purposes of illustration, let’s calculate a batch recipe and make sure the ABV is high enough to include the grenadine. A fairly typical recipe is 1½ oz silver tequila, ¾ oz grenadine, ¾ oz fresh lime juice, 5 dashes of Angostura bitters, and soda water. We want to include everything in the batch but the fresh lime juice and the soda water. So, a potential batch recipe would be 6 liters of silver tequila at 40% ABV, 3 liters of grenadine at 0% ABV, and 11.271 oz (roughly 333 mL of Angostura bitters) at 44.7% ABV. Plugging these figures into the formula above, the total batch ABV comes out to 27.3%.

Batch ABV Calculation.JPG

Using my own criteria, I would not allow this batch to be used in my bar because it contains a fruit juice syrup and has an ABV under 30%. That’s why it’s good to check these things out.

I’ve turned the formula above into an online calculator as well. You can use it for any batch with up to six ingredients, any more than that and you’ll have to grab a calculator. I hope it helps you out!

Storing Batched Cocktails

We batch our cocktails in large, 6 gallon NSF-rated food service buckets with spouts. Once all the ingredients are combined, we stir the mixture for several minutes with a large, NSF-rated whisk to incorporate all the ingredients. Then the batches go into the walk-in cooler onto custom-built, NSF-rated shelving. Because all the ingredients are shelf stable, it’s not strictly necessary that we keep the batches chilled, but it’s an added precaution we’ve always taken. Once the batches are in the walk-in, it’s simple to fill up the batch bottles we keep in the wells with the built-in pour spouts in the buckets. The batch bottles in the service wells are cleaned after each shift and replaced once they are a month old (again, this is not strictly necessary since all ingredients are shelf stable, but it’s just another example of how we ensure that our guests are getting the freshest-possible cocktails.)

For most of the batches we construct, the various ingredients have similar enough relative densities that giving them a good stir when they are constructed is enough to ensure that the batch remains incorporated until the bucket is empty. But there are batches in which liquids with different specific gravities will settle (usually those batches that include a more viscous ingredient, like a syrup or a particularly dense liqueur). For those batches, I have a weekly line-item on our prep sheet to give them a thorough stir. This ensures that the batch is consistent throughout it’s entire duration. It only takes our barbacks five minutes a week and ensures that I never waste any part of a batch due to ingredient settling.

More Information on Batching

Although this post covers the whys and hows of batching cocktails, there is lots more information about batching you may find helpful. See the posts below for more batching-related content.

Batching Cocktails to Save Money (coming soon)
Batching Cocktails and Inventory (coming soon)

Final Thoughts

I’ll admit that when I first started managing a bar, I—like those three panelists critical of batching cocktails at the Bar Smart Advanced seminar I attended—was skeptical of including batched cocktails in my bar. I was concerned that guests would be critical of the practice and that my bartenders would feel less like the craftspeople they are. I have since realized that getting a balanced, delicious, and well-made cocktail quickly is far more important to our guests than ensuring that their bartenders consider themselves artists. And I have found that changing the culture of our bar away from one in which the bartenders feel the need to justify their self worth with displays of their expertise to one in which they are humble and focused solely on providing our guests with true hospitality, has made our bar more popular, our guests happier, and has made the job of our bartenders more rewarding—both in terms of their job satisfaction and in terms of the average size of their tips. I hope this rather long and technical post has been useful in helping you decide if batching cocktails is right for your bar, as well as demonstrating a few best practices on how to do so. Cheers!

Notes

1 Why 30%? I’ll admit this is a fairly arbitrary number. After all, many commercially bottled fruit liqueurs are sold with ABVs far lower than this (18-22% is fairly typical). But my bar is not a commercial bottling operation; my standards of cleanliness, though very high compared to your average commercial kitchen, cannot compare with the sanitation regimes of commercial bottling operations that are using high pressure and high heat to sanitize their bottles and equipment. So, I let the alcohol do the work of preservation for me. I decided on the 30% ABV figure many years ago and anecdotal experience has shown me that it works to keep my batches free from spoilage, keeps my cocktails tasting fresh, and keeps my guests safe and happy.

Gin

JuniperBough.jpg

Gin seems to be the spirit everyone—except gin drinkers—loves to hate. For those who adore the flavor of runny tree sap, there is nothing better than downing 2-3 dry martinis while brandishing a cardboard wrapping paper tube like a light saber. For the rest of us, gin has connotations of blinding, prohibition-era bathtub concoctions cut with wood alcohol or Britain’s "Gin Craze" (which was credited with controlling London's "runaway" population growth). Negative references in the language abound; drunkards are described as “gin-soaked” and seedy drinking establishments attracting disreputable folks are called “gin mills”. Besides the historical aspersions, many people simply dislike the piney intensity of London Dry gins. But although the history of the spirit does have some sordid moments, and London Dry gins can taste like distilled Christmas trees, there is still probably a gin for you and so much to love about this versatile spirit.

A Definition, of Sorts

The word “gin” is a shortened form of the English word genever, which is related closely to the Dutch word jenever, both of which, in turn, are derived from the Latin word for juniper, juniperus. The juniper, a coniferous tree with fragrant, bitter berries and a trunk as twisted and contorted as the story of gin itself, is the key to what makes gin, gin. These berries (which are actually the tree’s female seed cones) impart a resinous, piney quality to gin that is part of its formal definition in every country that bothers to legally characterize it.

Gin is one of the most varied spirit classes. Flavors can range from almost neutral to botanical blends with just a hint of juniper to overpoweringly juniper forward. It can be aged or unaged. It can be malty and sweet, or clean and crisp. What all the variations have in common, though, is the presence of juniper flavor in the final product.

Most countries, the US included, do not actually require that the flavors in gin arise from the process of distillation. Instead, the flavor of juniper and any other desired flavors can be attained through the use of natural or artificial extracts added to a neutral spirit post distillation. Gins produced using this process, however, are considered inferior to gins in which all the flavoring compounds are created in the still during distillation, which is how most producers do it.

Although laws vary somewhat, there is a legal distinction for these different methods of production. In the EU, a bottle labeled simply “gin” has flavors added post distillation, a bottle labeled “distilled gin” or “London gin” or “London dry gin” is produced by distilling ethanol in a pot or column still in the presence of juniper and other natural botanicals. In the US, bottles labeled simply “gin” can be produced using either method, however, producers who distill the flavors into their gin can add “distilled” to the label if they choose.

Nearly all countries outside of the EU require gin to be bottled at no less than 80 proof (in the EU, it must be bottled at a minimum of 75 proof) but many gins are bottled at higher than the minimum required ABV.

Some History (Mythology)

Modern gin traces it’s roots back to jenver (genever), a Flemish distillation first produced in the 1300’s. At that point in history, the Flemish countries of Belgium and the Netherlands didn't exist, which is why you'll see various references citing one or the other as the birthplace of gin. Early genever was a crude pot distillation of malted grain that was only able to reach an ABV of around 25%. The product, called moutwijn (malt wine) wasn't very appetizing on its own (this was before humans realized they could age it into delicious whiskey), so various herbs and botanicals were added to disguise the flavor. One of the most successful moutwijn flavor maskers was found to be juniper, and genever was born.

Founded in 1575, the Bols Distillery is the oldest continuously-operating distillery in the world. The family started distilling Genever in Amsterdam 1664, eventually settling on their ideal recipe in 1820. At some point they stopped making genever but re-released their 1820 recipe in 2008, to critical acclaim and much enthusiasm from craft cocktail bartenders.

Like so many early alcoholic herbal elixirs, genever was originally marketed and sold as medicine. The beneficial properties of juniper in alcohol were claimed to be a cure for all manner of maladies—everything from gout to flatulence to intestinal worms. Any perceived respite from symptoms however, only lasted as long as the befuddling effects of the alcohol were present, and as distillation techniques improved and the spirit became more intoxicating, the Dutch government gave up any pretense of classifying genever as medicine and, by the early 1600s, had started taxing it as an alcoholic beverage.

Through separate, successive distillations, distillers were able to obtain alcoholic levels of around 100 proof and the spirit quickly gained popularity. By the mid-1600’s there were genever distilleries throughout the Dutch kingdom; over 200 in Amsterdam alone. Seventeenth-century British soldiers fighting on Dutch soil during the 30-years war (1618–1648) quickly took to genever as a source of intoxication during down time and a source of fortitude on the battlefield (this is where the term “Dutch Courage” originates).

The military brought genever back to England where—through the economic protectionism of William the Orange in 1689 which raised tariffs and prices on French brandy, and the subsequent parliamentary Distilling Act of 1690, which made it legal for literally anyone to distill spirits—it would explode in popularity and eventually evolve from the original, malty, whiskey-like beverage into the more neutral spirit we know of as gin today.

William Hogarth’s famous 1751 engraving “Gin Lane” was a biting critique on the culture of drunken debauchery and the societal breakdown caused by the unrestrained consumption of gin.

William Hogarth’s famous 1751 engraving “Gin Lane” was a biting critique on the culture of drunken debauchery and the societal breakdown caused by the unrestrained consumption of gin.

The direct (and easily foreseen) result of the 1690 Distilling Act was the “Gin Craze”, a defined historical period from 1720-1751 in which it is estimated that one in six London households was actively engaged in the production and sale of gin. Lesly Jacobs, in his book “Gin: A Global History”, asserts that “at any given time one out of every four residents—essentially all of the city’s poor—was completely and utterly incoherent.” The gin being produced in these household “stills” was not the refined, delicately-balanced product we know of as gin today, but little more than rotgut. In fact, the term rotgut was coined because of this low-quality gin and it is from this period that most of the historical and lexical aspersions for gin came about. Public drunkeness, ludeness, petty crime, murder, rape, negative health outcomes related to drinking, and drinking-related deaths all skyrocketed. The British Parliament responded to the growing crisis with no fewer than eight different “Gin Acts” from 1729-1751 to try to curb the cataclysmic societal misery caused by the rampant alcoholism. Fortunately, these acts eventually succeeded in their goal of curbing alcoholism and eliminating substandard distillations. They form the basis for the high-quality standards that all gin distilled in the United Kingdom (and abroad) must adhere to today.

Gin Classification

When most people say that they “don’t like gin” they are usually commenting on the London Dry style. And this expression of the spirit does have a kind of love it or leave it character. But the world of gin is so much broader than London Dry. I can’t count the number of times I have introduced a guest at my bar to a gin which they loved after they had enthusiastically proclaimed to me their hatred of the spirit. There are many who adore the piney intensity of the London Dry style but for those who don’t there are plenty of other options. Whiskey drinkers may find a road to gin through genever or Old Tom Gin, flavored vodka drinkers may find a citrus-forward gin to their liking, and amari drinkers may enjoy gins with botanical or herbal notes. Because gin can have such a wide variety of flavor profiles, it's helpful to classify it into certain categories. Some of the categories are legal definitions, some are merely a set of historical standards.

Genever
As we’ve already discussed, Genever is a spirit made from grain (malted and unmalted) and flavored with juniper and other botanicals. Whether or not genever is a subclass of gin is a matter of some debate. Some references call it a flavored whiskey, but most references I've seen separate it from the gin spirit family and give it its own category. I disagree with both approaches. Although there are certainly characteristics shared between genever and whiskey, the spirit definitely tastes more like gin than whiskey to me. As we discussed above, the only technical requirements for a spirit to be classified as gin is that it have juniper flavor and is distilled to a high enough proof. As genever usually fulfills both of these requirements (some brands bottle at less than 80 proof), in my opinion, it is clearly a gin. The primary manner in which genever differs from modern gins is the presence of malted grain flavor, which gives the genever a richer, somewhat sweeter character than gins distilled from neutral spirit.

There are three kinds of genever, jonge (young), oude (old), and corenwijn (corn wine). The terms have nothing to do with the age of the spirit or the grain used, but rather the level of malt wine contained in the final product. Malt wine is the old-timey name the genever industry gives to distilled spirit made from malted grain. Jonge genever contains up to 15% malt wine, with the remaining volume made up of neutral grain alcohol and water. This mixture produces a genever that is a closer relative of modern London Dry than most traditional genevers, with a distinctively less malty, more refined, and crisper flavor. Oude genever contains more than 15% but less than or equal to 50% malt wine. This is the more classic version of the spirit. Corenwijn is the richest and maltiest of the three, with between 50% and 100% malt wine. These tend to be the most expensive genevers one can buy and are typically not used in cocktails but instead consumed neat, like a single malt Scotch.

There are many great genevers on the market now, but the three-genever line-up from Bols, the longest continuously operating distillery in the world, are considered by many to be paragons of the form.

Old Tom Gin
Old Tom Gin is something like the gastronomical “bridge” between Genever and modern gin. Like genever it can be (but doesn’t have to be) barrel aged. And it can be (but doesn’t have to be) sweetened post distillation, which gives it a similar character to the malty-sweet flavor of genever in some respects. Most brands tend to be less botanical than a typical gin, another trait it shares with genever.

There are many legends about how Old Tom Gin got it’s name but one of the more credible origin stories is that of Thomas Norris. Norris sold gin out of casks he purchased from his former boss, Thomas Chamberlain, who was the distiller at Hodge’s Distillery. Thomas Norris named his casked gin “Old Tom” as an homage to his mentor, Thomas Chamberlain. This ad, by Norris, is the earliest known reference to the term “Old Tom” in print.

This is the style of gin that most historical cocktail recipes would have used as the base. If you ordered an Aviation, a Collins, a French 75, or basically any other gin-based cocktail prior to prohibition, it would most likely have been constructed with Old Tom Gin, making for a slightly sweeter version than you are probably used to if you enjoy gin cocktails nowadays. This sweetened character is a holdover from the practice of adding sugar or honey to early, low-quality gins to soften some of the more offensive flavors. As standards and production practices improved, the popularity of Old Tom started to wane. By the end of Prohibition in 1933, Old Tom Gin had lost serious ground to its drier cousin and by 1950 there wasn’t a single Old Tom Gin made in America. For over 50 years, the style was essentially extinct.

That all changed when Ransom Spirits released the first Old Tom Gin in America in over half a century back in 2006. Using historical records to emulate classic profiles, Ransom Spirits’ version is unsweetened and lightly barrel-aged to emulate the historical practice of storing gin in barrels during transportation. At nearly the same time (2007), a venerable London distillery called Hayman’s re-released an Old Tom using a recipe which had been in the family since 1870, but hadn’t been produced for years. Hayman’s version is not barrel aged but is slightly sweetened with sugar, post distillation. Both of these excellent products opened the doors for other distilleries to experiment, and now there is a profusion of Old Toms on the market, giving bartenders and gin drinkers a tool with which they can more precisely recreate classic cocktails.

London Dry Gin
Contrary to popular belief, London Gin—or as most people call it, London Dry—does not have to be made in London, or even England for that matter. It does, however, have to be made to exacting standards legally codified in 2008 (and updated in 2019) by the European Union. The technical details are a bit tedious but the bottom line is that the definition of London Dry has more to do with the process by which the gin is manufactured than it does with the place it’s made or the flavor of the final spirit.

Essentially, for a gin to be considered London Dry, it must be made from neutral spirit of agricultural origin, with an ABV of at least 96%, which is redistilled in the presence of all flavoring components. These flavoring components must include juniper and must be natural plant materials. The gin must come out of the still at no less than 70% ABV and is required to have a flavor that is “predominantly” that of juniper. Finally, it cannot be sweetened in excess of 0.1 grams of sweetening products per liter (100 ppm).

There are a few interesting takeaways from these regulations. First, what most people consider the defining feature of London Dry Gin—its aggressively juniper-forward profile, really has nothing to do with it’s actual legal definition. All that’s actually required by the regulations is that the flavor is “predominantly” that of juniper, meaning “at least 50%”. This is obviously a fairly subjective requirement and one that the vast majority of gins made in the world could easily meet.

Also, gins which add an infusion step after the distillation (like Hendrick’s does by infusing cucumber and rose) cannot be considered London Dry gin, even if they meet all other requirements and even if most people would associate the flavor with a classic London Dry. In addition, a gin like Radoune, which uses mushrooms in it’s botanical blend would not be considered a London Dry since fungi are not plants.

The principle take away here is that the legal standard for London Dry is more concerned about ensuring quality in the production process than it is about stipulating a specific flavor profile. That said, the historical association London Dry has with a robust, juniper-forward profile is still the stylistic shorthand that the layperson will likely employ when classifying any particular gin they happen to be drinking.

The most famous gins in the world are pretty much all in the London Dry style: Gordon’s, Beefeater, Broker’s, Tanqueray, Bombay Sapphire; these well-known brands are all making quality gins. But there are a few up-and-coming independent distilleries that are also putting their stamp on the style. Aviation Gin is a great example, as is Sipsmith’s London Dry.

Navy Strength Gin
The term “Navy Strength” conjures up romantic images of rugged men “battening down the hatches” and “splicing the main brace” while battling stormy seas and pirates, all while “three sheets to the wind”. And although it does have ties to the early days of sailing the high seas, the expression “Navy Strength” is actually a marketing term from the 1990s. It has no legal meaning, but it usually refers to a spirit with a minimum ABV of 57.1%. “Overproof” gin is also bottled at a higher ABV than most gins, but overproof is a less precise term within the industry, usually indicating that a spirit is at least 50% ABV.

Sailors line up for their “tot” or daily ration of alcohol. After the discovery of the new world, enlisted men in the Royal Navy typically received an allotment of rum, while officers received gin or brandy. The term “Navy Strength” can apply to any spirit, but is used most often for rum and gin.

Why 57.1% for Navy Strength? There are several reasons. This was the minimum strength of spirit that could be aboard Royal Navy ships because at 57.1% a mixture of alcohol and gunpowder would still ignite. This was important because it was one way to prove to the sailors that their daily allotment of alcohol was not watered down (this is where we get the term “proof” as a measure of alcoholic potency). In addition, if a cask of gin was spilled and soaked a cask of gunpowder, the powder was still usable. Finally, in the cramped hold of ships loaded up for long voyages, space was at a premium, having spirit at a higher proof was a good way to store more ethanol in less space.

So the Navy liked their spirit strong, that’s all fine and dandy, but why do we care today? Navy strength gins are often geared toward those making cocktails, who are looking for a bit of extra zing to ensure the gin stands up to the other ingredients in a drink. Sometimes, Navy Strength gins are simply less diluted versions of a distillery’s flagship gin, as is the case with Hayman’s Royal Dock Navy Strength Gin, which is simply a more potent version of their regular-strength London Dry. Other distilleries craft a new expression for their Navy Strength offering. This is the case with Leopold Bros. Navy Strength. A completely new botanical blend was used from their Small Batch Gin, which the distillery believes works better with the higher proof.

I hesitate to put high proof gins into their own category because they could easily fit into the classic categories we’ve already talked about or the contemporary category below, but the strength of the alcohol is an important feature of a gin’s flavor, and with Navy Strength and overproof gins, that feature is highlighted.

Contemporary Gin
Except for the categories specified above, and a few legally-designated examples mentioned below, every other gin is lumped into this broad category. Contemporary gins are those gins which—starting haltingly with a few early examples in the late 90s and gradually becoming a cascade of new gins in the last ten years—redefined the centuries-old characterization of what gin should taste like, namely, like juniper and pretty much nothing else. These gins still have the juniper flavor present but they push the boundaries of what gin can be by letting other botanicals take center stage. A contemporary gin could legally be labeled a London Dry while not conforming to the classic, juniper forward profile. This is a stylistic category, not a legal one, and styles can be predominantly citrusy, spice-forward, floral, herbal, or any combination of these properties.

Some contemporary gins let the flavor of citrus dominate. Prime examples include Uncle Val’s Botanical Gin, an incredibly well-balanced gin with a lovely lemon-lime intensity (even though they don’t use limes in the distillation) and Chemist South Slope Gin, which uses five different types of citrus in the distillation including lemon, grapefruit, and orange.

When we are talking about “spiciness” with gins, we’re typically not talking about the type of spice one associates with capsaicin, which provides the spicy heat caused by hot peppers (although there are a few interesting, spicy-hot gins on the market). Instead, we are referring to actual spices that may dominate the profile, things like coriander, curry, cinnamon, and cardamom. A great example of this style is Opihr Spiced Oriental Gin with notes of coriander, cardamom, cubeb, black pepper, and ginger. Esker Gin, with cassia, pink peppercorns, and rosehip is another lovely example of the form. These spicy gins can make classic gin cocktails turn into completely different drinks, they are really interesting to experiment with.

Floral gins are a major contributor to this category, as it seems like nearly every distillery likes to add at least some floral character to their botanical blends. These gins can really make the floral character pop in cocktails that already call for a floral component, like the Aviation, and they also give a floral kick to classics without a flowery component; I love a floral G&T or Bee’s Knees. Two of my favorite floral gins are Hendrick’s Orbium with elderflower, lotus blossom, and rose, and Empress Gin which employs rose and butterfly pea flower both for flavor and to imbue the gin with an extraordinary blue hue that is fun to play around with in cocktails.

Herbal gins—also called alpine gins or botanical gins—probably make up the largest subsection of this category. Piggybacking off the herbaceous notes provided by the juniper, they take things a step further with verdant botanicals like herbs, grasses, barks, roots, tea, etc. These gins are often trying to embody the local terroir, a sense of place with a more specific story than that of other gins. A prime example is Roku Gin, made by Suntory (the same folks creating some of the most sought-after Japanese Whiskies in the world). More than just a blend of local flora, it’s a distillation of Japan’s cultural heritage. Botanicals including yuzu, cherry blossom, cherry leaves, sansho, and green tea make drinking this gin feel like a walk through a Japanese garden. St. George Spirits’ Botanivore Gin is another herbal bomb. Flavored with 16 different botanicals, including orris root, bay laurel, star anise, hops, and dill seed, it’s a surprisingly well-balanced sensory masterpiece.

Plymouth
No offense to the Navy Strength gins mentioned above but the true Navy Gin is Plymouth. The distillery is just a stone’s throw away from the Royal William Victualling Yard so it was an obvious choice for stocking Royal Navy ships before they headed out to sea. Plymouth Gin was first distilled in 1793 and for 200 years had it’s own Protected Geographical Indication (meaning that Plymouth Gin was legally distinct from other gins). The designation lapsed and was not renewed in 2015 so it’s no longer technically its own category but there are enough references that still ascribe it such a designation, so I wanted to call it out. Plymouth Gin was distinct enough from Old Tom and London Dry, the only other styles around for hundreds of years, to be a legally defined style but nowadays we would likely lump it in with the contemporary gins. Plymouth still has enough juniper to be a clear offshoot of the London Dry style but earthy notes of angelica, along with cardamom and coriander, make it its own thing.

Xoriguer Mahón Gin
Mahón Gin is a legally recognized style of gin within the European Union. With the passage of the European Union Regulation 110 in 2008, any brands that had previously held Protected Geographical Indication status as their own legally defined styles were required to prove they were unique by making their recipe publicly available. Plymouth chose to let the protected status lapse so its recipe could remain a secret, Mahón decided the protected status was worth it, published its recipe, and is still legally unique. Made in Mahón, the capital city of the island of Majorca, Spain, what makes it unique is the use of distilled Spanish wine as a base instead of neutral grain spirit and the practice of aging the juniper berries in open rooms exposed to the sea air for two years to concentrate their flavor and take on the brininess of the ocean. It definitely has a unique character that transports the imbiber straight to the Mediterranean. It’s worth a try if you’re a gin fan looking for something completely terroir-driven and different.

Sloe Gin
Sloe Gin is a ruby red liqueur made by infusing gin with sloes (a relative of the plum). Because of the widespread historical use of the term “gin” to describe the liqueur prior to the EU spirit regulations in 2008, there was an exception carved out for it; it is the only liqueur that can use the term “gin” in its name without having to append the word “liqueur”. The EU requires sloe gin to be made only with natural ingredients and have an ABV of at least 25%. Outside the EU, there are no regulations regarding the production of sloe gin and there are many brands that are little more than artificially flavored and colored vodka that taste like cough syrup, so make sure you are buying a quality brand if you decide to try it. Also, brands within the EU that use all-natural ingredients can add the term “liqueur” to the label if they wish but brands that use artificial components must add the term “liqueur”. So, chances are if the bottle says liqueur, it’s artificially flavored. Plymouth and Sipsmith both produce excellent sloe gins and are great options for making a classic Sloe Gin Fizz.

Final Thoughts

So that’s gin in a (very long) nutshell. If you read this far you are either already a gin fanatic or soon to be one. I hope this post has given you a taste of what gin can be, beyond the London Dry style and has been useful for giving some historical and production-related insights into this super versatile spirit. Cheers!

Further Reading

If you want to learn more about gin, especially about individual gins you might like to try out, I recommend the blog The Gin is In. It is an invaluable resource for articles on gin and unbiassed reviews on unique gins from around the world. The blog’s flavor chart for each review changed the way I evaluate the gins I carry in my bar and formed the basis for the classification system I laid out in this post. It’s also really well written. Check it out!

Quick and Easy "Irish Cream"

There is something fundamentally disturbing about Irish Cream that doesn't need to be refrigerated. I'm looking at you, Bailey's. Bailey's claims that they use only fresh cream in their disgusting concoction and that the only preservative is alcohol, but I don't buy it. Apparently, companies can call whatever that chemical soup is sitting out on the table at truck stop diners "cream" as well.

How about some actual cream in your Irish Cream? There are some Irish Creams that require refrigeration after opening, and I'm more inclined to trust them, but it's so easy to put together your own version of this winter staple, I figure, why not?

This recipe is certainly not a traditional way of making Irish Cream, and the taste is completely unique, much less sweet than your typical Irish Cream thanks to the bittering effect of the stout, but It's so delicious and easy, it might be your go to after dinner desert drink from now on. This recipe makes six hefty servings. And it uses actual cream as the base.

Quick and Easy "Irish Cream" (Nathan Robertson, 2016)

Irish Whiskey                                   ⅓ cup (or more, to taste)
Guinness Stout                               1, 12-oz can
Vanilla Bean Ice Cream                  1½ cups
Chocolate Syrup                             ⅓ cup
Sea Salt                                           1 pinch

Scoop ice cream into a medium-sized glass bowel with a pour spout, add Irish Whiskey, chocolate syrup, and salt. Let concoction sit out for around 15 minutes to melt (or use the microwave, I found that 45 seconds to a minute worked well). Once ice cream is softened to the point that it is stirrable, add the Guinness and stir it in completely. Serve on the rocks.

Tres Flores

I have great respect for vodka. I'm always impressed by the skill of a master distiller who creates an outstanding, nearly neutral spirit, with or without the aid of filtration. I love the history and cultural significance of vodka. I enjoy the elegance embodied in a well-chilled, neat pour of vodka, drunk delicately, with a meal, so as to savor its fine subtly of flavor and texture. But I hardly ever use it in cocktails.

I used to be one of those people who avoided it because being a vodka "hater" was trendy; ironic for me, as no one who has ever met me would deign to call me trendy, but that dark time is behind me. These days, my reluctance to use neutral spirits as a base in cocktails boils down to my desire to have the base spirit influence the overall flavor of the drink. 

But every once in a while, I create a drink for which vodka is the perfect base, precisely because of its neutral quality. That was the case the other day, when I made a lovely young woman from Sweden the Tres Flores. I wanted the delicate floral flavors in this drink—elderflower, violet, and rose—to take center stage; vodka to the rescue. This drink is strong, subtle, and beautiful. It's also delicious. Martini drinkers who want something a little different will love it.

Tres Flores (Nathan Robertson, 2016)

Vodka                                                  2½ oz
St. Germain Elderflower Liqueur     ½ oz
Crème de Violette                              ¼ oz
Rose Water                                         15 drops

Combine all ingredients, with ice, in a stirring vessel. Stir. Pour into a chilled cocktail glass and garnish with a rose petal and four drops of rose water, placed on the petal.

Vodka

The establishment where I work has over 600 different bottles of spirits and liqueurs on our back bar. Keeping up with that kind of inventory and making sure we have backups of any bottles that are getting low is a weekly task. Those backup bottles are stored in our liquor room on a series of deep shelves, organized by spirit family. Bourbons are on the bourbon shelf, gins on the gin shelf, etc. They're all labeled pretty conventionally, with the exception of the vodka shelf, that shelf is labeled "boring".

In craft settings, we generally like the flavor of the spirit to influence the overall flavor of any drinks we're using it in, so, for a while, it was considered en vogue within the industry to have a general disdain for vodka (this trend is beginning to reverse). But there is no questioning vodka's supremacy in terms of sales. It is, by far, the most popular liquor in the world. In the US, vodka outsells gin, rum, tequila, scotch, and Irish whiskey, combined.

So why does such a popular spirt get such a bad rap from booze snobs the world over? And how is vodka different from other grain-based, high-ABV beverages like moonshine? And what's the deal with all these crazy flavored vodkas, like those made by Pinnacle? Everything you ever wanted to know about vodka, and some stuff maybe you didn't, below.

A Definition, of Sorts

Vodka is an unaged, distilled spirit comprised primarily of ethanol and water. In most countries, including the US, vodka is defined as having a "neutral" quality arising either from precise distillation or post distillation filtration resulting in a beverage without "distinctive character, aroma, taste, or color." Of course, if you have ever tasted several vodkas together, you know that "neutral" is pretty loosely defined. Nearly all vodkas exhibit a subtle yet distinct flavor profile.

This is where vodka differs from other high proof grain-based liquors. Moonshine, for instance, distilled from corn (like most vodka in the US) to around 190 proof, differs from it's Slavic cousin in that the goal of the distillation isn't to create a neutral spirit, but to retain the flavor of the grain and the terroir. Moonshine isn't filtered, like vodka, or aged in oak, like other whiskeys, for the same reasons.

Vodka is traditionally made from grain or potatoes but it can be made from literally any fermentable sugar, and many vodkas in production today use fruits, beets, sugarcane, or even wood pulp as a base. The US and many other countries set a minimum threshold of 80 proof for any vodkas sold in bottles (in the EU, it must be bottled at a minimum of 75 proof). Unlike scotch or pisco, vodka can be distilled anywhere in the world. As long as it meets the legal requirements for a given country, it can be sold there as vodka regardless of where it originated.

That said, some European countries, specifically those in the vodka belt, are lobbying the EU to define vodka as a distilled alcoholic beverage made only from a base of fermented potatoes, grain, or beets. Although those lobbying efforts haven't yet resulted in any statutory changes, if they eventually succeed, vodka distilled from sugarcane or fruit could not be sold legally in the EU under the name "vodka".

The word vodka like so many other spirits (including whiskey, aquavit, eau de vie, etc.) is a derivation of the word water. In this case, it's etymological roots trace back to a diminutive form of the Slavic word for water, voda. So, vodka, translated, means little water, which is an elegantly succinct way of defining vodka when one considers the process of distillation that creates it.

Some History (Mythology)

Although there is very little in the way of a written historical record, vodka production started in the part of the world now known as the vodka belt (Northern, Central, and Eastern Europe and Russia) in what is now Poland during the early middle ages. It was originally distilled as medicine, and it's antiseptic properties are well known.

Early distillations were much cruder and lower proof than the refined spirit we drink today. With primitive still technology, three successive distillations were normally required to bring the spirit to only 80 proof, and then it was usually diluted down to around 30 proof for drinking. These distillations were not nearly as precise as those obtainable today, so the neutral quality of vodka we've come to expect wasn't there. Instead, like moonshine, those first vodkas were maltier and sweeter than today's versions.

Production, the Good

Modern vodka production couldn't be more different. For those producers who actually distill their own product (increasingly rare) the process usually takes place in a column still. Some column stills have enough chambers to bring the spirit to final proof in a single distillation but often several successive distillations are still used.

Vodka is usually distilled to around 190 proof (95% ABV). By the time the ethanol content gets that high, nearly all the congeners and flavoring compounds are gone from the spirit, but most producers in the US still filter their distillate through a variety of substances to make the final product even more neutral. Cotten, activated charcoal, paper, even diamond dust, are commonly used filtering mediums for vodka. Many traditional producers, especially those in the vodka belt nations, choose not to filter the end product, relying on multiple distillations and the skill of the distiller cutting out the heads and tails to make the spirit as neutral as possible.

Although filtration does strip out flavoring compounds, the choice of filtering agent will often impart a specific texture to the vodka. You may not notice it unless you drink it neat, but vodkas can have textures ranging from thin and crisp to oily to thick and almost creamy. This is often a product of the water chosen to bring the vodka down to final dilution as well. Even the hoses and pumps used to circulate the vodka around the distillery contribute to the texture in subtle ways. For imbibers drinking their vodka neat, the texture, or mouthfeel, is an important aspect of the taste.

Production, the Bad

For some principled producers, the description I gave above is still how it's done. But for most vodka made in the US today, and increasingly for vodkas produced in Europe as well, "distilleries" are buying bulk 190-proof ethanol from giant agribusinesses like Archer Daniels Midland. These huge conglomerates produce ethanol, usually distilled from corn, in massive quantities. All your local "craft distiller" is doing, in many cases, is diluting the ethanol down to final proof and bottling it. For this reason, I recommend that you never pay extra for a "premium" vodka if you are going to be using it in a mixed drink.

In addition, that "citrus" vodka you bought to make the best Cosmopolitan ever is likely not flavored with natural citrus but instead with chemical compounds produced in labs. You might have suspected this when you saw that perfectly clear bottle of cinnamon roll-flavored vodka on the shelf at the campus liquor store, but it's true for nearly all flavored vodkas. 

Some producers are legitimately using natural ingredients to impart flavor, and if flavored vodkas are your thing, the true examples of the form are worth checking out. Hanger 1 out of California makes an amazing mandarin orange blossom vodka that is a lot of fun to play with and Żubrówka, one of the oldest distilleries in the world, makes an incredible bison grass flavored vodka. Or, if you're truly ready to branch out, you could always opt for the original flavored vodkagin.

How to Drink Vodka

First off, other than excessively, there's no wrong way to drink vodka. It's neutral nature lends itself well for use in cocktails where you want the other flavors to dominate. And for all the flack I gave to artificially flavored vodkas above, if you're the type of person who doesn't mind putting lab chemicals into your body, there are lots of fun ways to use some of the more exotic flavored vodkas on the market.

But for me, my favorite way to drink high-quality vodkas is neat, well chilled, and undiluted. Sticking a bottle in the freezer for a few hours does a great job of bringing the spirit down to perfect sipping temperature. Drinking it in this manner allows you to savor the nuances in flavor and texture of this supposedly flavorless spirit. Try several great vodkas side by side and you'll be blown away by the liveliness and complexity of this "boring" drink.

Notes

The US definition of vodka and other spirits can be found in the Code of Federal Regulations or CFR. Specifically, Title 27, Chapter 1, Subchapter A, Part 5, Subpart C, Section 5.22. You can go here for the actual legal info.


Mezcal

If, Dear Reader, you are already involved in the hospitality industry, you may have been aware of a bit of a kerfuffle in the early spring of 2016 when Huffington Post published an interview with Jon Taffer (the moronic host of the ridiculous show, Bar Rescue) in which he claimed (among other imbecilic declarations) that tequila was hallucinogenic because it was derived from mescaline. As a great many important people within the industry gleefully pointed out, the two substances have nothing to do with each other.

As a supposed "expert" on all things alcohol, Taffer's gaffe is inexcusable, but for the average person who may not be as familiar with distilled spirits, the difference between mezcal, tequila, sotol, and the other distillations coming out of Mexico can be confusing. In this post we'll examine what makes these various spirits different and what makes them similar and hopefully open your tastes to a whole world of great booze beyond tequila. 

Although Mexico produces a variety of fermented beverages and spirits including rum, whiskey, and even fernet, the ones we're interested in for this post are those derived from plants in the family Asparagaceae. These include mezcal and it's various subclassifications such as mezcal, tequila, raicilla, bacanora, tuxca, and other non-mezcal spirits like sotol and comiteco. If you were reading carefully you may have noticed mezcal mentioned twice in the previous sentence, and although it may look like a typo, mezcal is actually a subcategory of mezcal, which is probably part of the reason that there is some confusion surrounding all these different spirits. To begin to clear things up, take a look at this flowchart of alcoholic products derived from plants in the family Asparagaceae.

Alcohol From Agave (5).png

All these different spirits are classified based on the type of plant used in their production, the production process, and the area of Mexico in which they are produced. Except for sotol, the principle plant used to create them is the Agave, a genus of flowering succulents with over two hundred different species and natural hybrids. The other plant of interest to us is Dasylirion wheeleri, common name Desert Spoon, which was once thought to be part of the Agave genus but has been reclassified in recent years due to DNA testing. Desert Spoon is a spiky evergreen shrub from which sotol is distilled. Since sotol is made from Desert Spoon and not an agave varietal, it is technically not mezcal (mezcal is any distillation of fermented agave piñas), however, because it was once thought to be an agave distillate, most references (and most of the people of Mexico) still consider it mezcal.

There are two ways of using the agave plant to produce alcoholic fermentations. One method is to ferment the sap of the agave (called aguamiel) and the other is to ferment the heart of the plant (called the piña). These distinct processes produce fermentations with very different tastes and the subsequent distillations are dramatically different as well.

Pulque and Comiteco

The native people of Mexico have been making pulque—sometimes referred to as Mexican mead—for over a thousand years. The milky-white drink is a viscous and slightly sour beverage made when aguamiel is fermented. If pulque is then distilled, the resulting spirit can be called comiteco. Pulque can be produced from several varietals of agave but the most common is Agave americana, or maguey. Aguamiel can only be drawn from large plants, which usually take around twelve years to mature. Once mature, the aguamiel is drawn off using taps similar to those placed into maple trees to draw off the sap that eventually becomes maple syrup. A single maguey plant will produce up to six liters of aguamiel per day and can survive for up to a year after being tapped. On average, each maguey plant produces around 600 liters of aguamiel before it dies.

Traditionally, the extracted aguamiel is taken from the field to a fermentation house called a tinacal and placed into large vats called tinas to begin the fermentation process. Unlike beer production which uses various species of yeast as the fermentation agents, pulque is fermented when a bacterium, called Zymomonas mobilis, digests the agave sugars and excretes ethanol. The fermentation is a delicate process and temperature and humidity must be carefully controlled to prevent the pulque from souring. At the height of the fermentation process, the pulque is transferred to barrels and shipped to market. It continues to ferment until consumed so it must be imbibed within a short window of time before it goes bad. The short shelf life is part of the reason it is essentially unavailable outside of Mexico. Pulque is not the only fermented agave beverage consumed in Mexico, the intermediate fermentation of the agave piñas during mezcal production, called tepache is apparently delicious as well but not usually available commercially.

Comiteco is the distillation of fermented agave sap (pulque). Beyond that, information on comiteco is hard to find. So if any of my readers have insights, please comment below and I'll incorporate any info into an updated post. From what I've been able to glean from the few Spanish-language sites that have some information on it, there doesn't seem to be a legal definition for the spirit. However, some historical norms apparently exist. To be called comiteco, the spirit must be distilled in the Mexican state of Chiapas and is traditionally derived from pulque made from Agave americana (although it appears other agave species can technically be used). Comiteco has a very different taste than mezcal but like other agave spirits, it has various aging classifications including blanco, añejo, and reserva especial. It is frequently flavored by infusing fruits such as peach, blackberry, and jobo into the final distillate. I've never tried comiteco but I would love to; my research has not turned up a single American distributor so I may just have to take a trip down to Chiapas to get the real deal.

Mezcal, the Category, Definition and Production

As I mentioned before, mezcal is both a broad category of spirits and a narrow, legally defined product. Broadly, mezcal is classified as any spirit distilled in Mexico from the heart of any species of agave. Mezcal is produced, importantly, not from the agave sap used to make pulque, but from the agave piñas themselves, it is NOT distilled pulque. By this definition, mezcal encompasses the legally defined spirits of tequila, raicilla, bacanora, tuxca, the legal subcategory mezcal, and historically speaking, sotol, as well as those agave distillations without a legal definition, usually labeled simply, "agave distillate". Because the process for making sotol is so similar to the process for making mezcal, I'm going to talk about them as if they were in the same category, even though they technically aren't.

The production of mezcal starts with the harvesting of the agave piñas (or in the case of sotol, the Desert Spoon piñas). The piña is the heart of the plant and they can weigh up to two hundred pounds. Piña means pineapple in Spanish and the hearts, without the spines, do resemble the tropical fruit. Depending on the species and the region in which they are grown, the plants reach maturity after seven to thirty years, at which point they are dug up, the spines are cut off, and they are prepared for fermentation. Depending on the variety of mezcal being produced, this means either boiling the piñas, cooking them in an oven, or roasting them in earthen pits. The process of cooking the agave piñas breaks down the complex carbohydrates within the plants cellular walls, turning them into basic starches and simple sugars that are more readily fermented. Then the piñas are ground up. For the larger operations, industrial shredders are used for this step but many mezcals come from tiny batches and in these productions, the agave hearts are ground manually with traditional horse-drawn stone wheels called tahonas. 

The grinding process extracts the juice of the piña, which is (often) combined with water and poured into large fermentation tanks where it ferments for several days. The fermented product, called tepache, is then distilled twice in either column stills for large, industrial tequila production, copper pot stills, or even traditional clay pot stills for the super small batch, artisanal distillations. In some cases, the mezcal is then aged for a period of time in oak barrels. Water is then added to bring the mezcal to final proof and the spirit is bottled.

Mezcal, the Product

Although mezcal is a broad category that encompasses all distillates derived from fermented agave piñas, for a producer to label their product, "mezcal" it must be made under certain conditions. First and foremost, it must be made in one of the eight states that have received legal status from the mezcal regulating authority of Mexico (the CRM): Oaxaca, Durango, Guanajuato, Michoacan, Guerrero, San Luis Potosí, Tamaulipas, and Zacatecas. Oaxaca is the largest Mezcal-producing state, with roughly 80% of distillations originating there. There are over two hundred subspecies of maguey or agave and Mexican law allows any of them to be used in the production of products labeled "mezcal" as long as the varietal is not used as the primary material in other government Denominations of Origin, which means that products labeled "mezcal" cannot be distilled from Blue Agave. In practice only about 30 agave varietals are used in the production of mezcal with espadín, arroqueño, cirial, barril, mexicano, cincoañero, and tobalá being the most important.

Tequila

When it comes to agave-based distillations, there is no doubt that tequila reigns supreme, especially in the US. The United States accounts for 52% of global sales and since 2002, US domestic sales of tequila have increased by an average of 5.6% per year, making it one of the fastest growing spirits in America. Tequila is distilled from fermented agave piñas and is therefore a mezcal. But it differs from mezcal, the legally defined spirit, in several subtle ways. First, unlike the wide range of agave species that can be used to make mezcal, tequila can only be made from the Blue Agave, latin designation Agave tequilana. Tequila can only be produced in the states of Jalisco, Guanajuato, Michoacan, Tamaulipas, and Nayarit. Jalisco is historically the most important area for tequila production and where the town of Tequila is located. Three states—Guanajuato, Tamaulipas, and Michoacan—are legally allowed to produce both tequila and mezcal. 

While most mezcals are made in small batches using traditional methods, the majority of tequila production has become fairly industrialized. The agave piñas are harvested in much the same way as they are with mezcal but that's where the similarities stop. In tequila production, the agaves are baked not in earthen pits but in large industrial pressure cooking ovens known as autoclaves (in the lowest quality tequilas, the agaves are sometimes boiled instead of baked). Cooking the agave piñas in autoclaves instead of slow roasting them in earthen pits saves tequila producers a lot of time and money and, more importantly, gives tequila a much softer, less smokey character that many people prefer. Once cooked, the piñas are shredded using industrial shredders (instead of ground using traditional tahonas) and the resulting pulp and juice is fermented in huge fermentation tanks for several days. The fermented mash is then distilled using large stainless steel or copper column stills. Column distillation is a much cheaper and faster process than the pot distillation used in most mezcal production.

Unlike mezcal, which, since 2015, must be 100% agave, tequila needs to consist of only 51% agave. This creates two broad categories of tequila: tequila mixto, and 100% agave tequila. Those tequilas designated as 100% agave must be fermented from Blue Agave grown in one of the legally defined tequila regions in Mexico but for tequila mixto, it's a bit more complicated. In mixtos, the Blue Agave can be "enhanced" with other sugars in the fermentation process up to a proportion not exceeding 49% of total reduced sugars (expressed in units of mass). Cold mixing, that is, blending 100% agave distillate with neutral cane spirit prior to bottling, is not permitted. The portion of the mixto not made from Blue Agave may not be made with sugars from any species of agave; cane sugar is usually used. Mixtos are, in general, lower in quality than tequilas that are made from 100% agave. Tequila oro (gold tequila, also called joven) is usually a mixto that has had artifical coloring or flavoring added to make it look aged. However, there are some 100% agave oro tequilas that are a blend of blanco and reposado tequilas, so not all gold tequila is necessarily artificially colored. Although tequila mixto must be produced in Mexico, the undiluted distillate can be exported in bulk to a bottling facility outside of the country where it is diluted down to final proof and bottled.

Once distilled, the tequila is either bottled immediately or aged in oak casks for a certain period of time prior to bottling. There are several legally-defined stages of aging for 100% agave tequila: blanco, reposado, añejo, and extra añejo. Blanco tequila (also called plata) is either bottled directly after distillation or rested several weeks in neutral stainless steel or glass tanks prior to bottling. This brief resting period mellows the spirit slightly, softening the alcoholic intensity. Reposado tequilas are aged in oak casks for more than two months but less than one year, añejo tequilas are aged for more than one year but less than three years in oak casks not larger than 600 liters, and extra añejo tequilas are aged for more than three years in oak casks not larger than 600 liters. All aging must take place within one of the designated tequila producing regions of Mexico and, unlike tequila mixto, all 100% agave tequilas must be diluted to final ABV and bottled in Mexico.

Raicilla

Raicilla is an agave distillation produced in the western part of the state of Jalisco. The name means, "small root" and the two agave varietals used in raicilla production are smaller than those used in other mezcals. Raicilla can be made from the pata de mula (mules foot) agave, latin designation, Agave maximiliana and the lechuguilla agave, latin designation, Agave inaequidens. Although in the past, raicilla was illegally distilled as moonshine, in recent years raicilla producers have organized themselves into a cooperative and started forming rules for what makes Raicilla a distinct mezcal. There is no official recognition of the spirit within Mexico but that will likely change in the coming years as raicilla producers gain more say in their product. The flavor of raicilla varies depending on the area of Jalisco it is produced. Mountain regions produce a spirit that tastes a bit like Sotol, it's woody, earthy, a high degree of minerality and herbaciousness with just a touch of citrus. The maritime raicillas are much more citrus forward, with bright flavors, and a touch of smoke, much like an espadín mezcal. Production methods follow those of other traditional mezcals, with the slight difference that the agave piñas are cooked in wooden ovens and then pulverized with wooden clubs instead of ground with stone wheels prior to fermentation. Once distilled, the spirit has a similar aging system to that of tequila with slight variations. Blanco raicillas spend no time in oak barrels, jovens spend less than a year, reposados age for between one and two years in oak, and añejos are aged for over two years before bottling. 

Bacanora

Bacanora is produced in the Mexican state of Sonora from the wild agave plant Yaquiana, latin designation, Agave angustifolia. It is named after the town of Bacanora and has a very similar flavor and production process to the legally defined spirit, mezcal, in which the Yaquiana piñas are roasted in earthen pits prior to fermentation. Bacanora has been a legally recognized mezcal within Mexico since 2000 but it is not internationally recognized.

Tuxca

Tuxca is a distilled spirit derived from pit roasted agaves made exclusively in the southern part of the Mexican state of Jalisco in the area around Tux. The region is located in the midst of the Trans-Mexican Volcano Belt and the soil of the area is nearly all volcanic debris high in diverse mineral content. This unique soil lends tuxca a fascinating terroir rich in minerality. Coupled with the smokiness imparted by the pit roasting of the agaves, tuxca has one of the earthiest, almost dirty (in a good way) flavor profiles of any mezcal. The spirit is not legally defined within Mexico but it is traditionally a 100% agave product made from several different agave varietals including Lineño, Ixtero Amarillo, and Cimarrón.

Other Agave Distillations

There are many other agave distillations within Mexico that don't fall within these categories. Nearly every village has a mezcalero or two making mezcal just as his ancestors have for generations, each one slightly different from anything else being made in the country. The government of Mexico has passed a few regulations for these other agave distillations that must be met if a producer wants to bottle and sell his creation. For the most part, these regulations are similar to those for tequila, with the principal requirement that the spirit be labeled simply, "agave distillation" if it isn't otherwise legally defined.

Sotol

As previously mentioned, sotol is made from Dasylirion wheeleri, not an agave varietal, and is therefore technically not a mezcal. But the agave and Desert Spoon are so closely related and the production process is so similar, that most of the people of Mexico consider it a mezcal. Sotol is produced in the Mexican states of Chihuahua, Coahuila, and Durango. Desert Spoon is a smaller plant than most of the agave varietals used to produce mezcal and, as a result, each plant produces an average of one bottle of sotol (compared with five to seven bottles of mezcal per agave plant). It has been a legally defined spirit within Mexico since 2004 but it doesn't have international legal recognition.

Wrap Up

I hope that you got something out of this whirlwind overview of spirits distilled from plants in the family Asparagaceae. I covered a lot but even so, I've barely scratched the surface of this complex category. Just to help you make some sense out of all this info, I created this chart that highlights a few of the differences between all these spirits. The category reminds me a lot of rum in that, even though each distillation starts with the same essential base ingredients, they can still be so wildly different. It's fascinating to taste different mezcals side by side to see how unique each one truly is. I highly recommend you try a new one next time you're at a bar with a nice selection.


Notes

Under pressure from Taffer's people, I'm sure, Huffington Post has since removed the offensive quote from the article, so I'm posting it here for posterity. When he was asked if different kinds of alcohol affect people differently, Taffer responded, "I’m not sure if there’s a definition of one gets you angry or not, but tequila is inherently made from mezcal, which mescaline, the hallucinogenic drug is made from. So tequila can have a hallucinogenic component, you might be talking to someone who’s not there. (Laughs)"

Pamp. and Circumstance

We're wrapping up Negroni Week at the bar I work in and we've gone through too many bottles of Campari to count. What an incredible ingredient! The more I play with it, the more versatile it becomes. My new favorite thing is to combine it with Fernet-Branca (the Bartender's Handshake!). Although both of the amari are bitter, they have very different bitter profiles that still play nice together. It's hard to beat the simplicity, elegance, and downright blissful taste of the classic Negroni (made with an excellent vermouth like Carpano Antica) but that hasn't stopped many of my regulars from requesting Campari-based libations for round two. Here's one of my favorites from the past week. It uses a dynamite grapefruit liqueur made by Combier called Pamplemousse Rose (pronounced pomp-luh-moose, hence the cocktail's name). Love this stuff; it's light on the pallet with an intense grapefruit flavor but it's still sweet enough to counter the bitterness of the Campari and Fernet and the tartness of the lime without any additional sweeteners.

Pamp. and Circumstance (Nathan Robertson, 2016)

          Campari                                  1 oz
          Pamplemousse Rose             1 oz
          Fernet-Branca                        ½ oz
          Gin                                          ½ oz
          Fresh Lime Juice                   ¾ oz

Combine all ingredients in shaker tin and shake with ice until properly diluted and chilled.  Strain into chilled coupe. Garnish with an orange swath, expressed the oils over the top of the drink.

Ingredients Part 5: Eggs

Booze and eggs. I've known that these things go well together ever since I snuck a taste of my grandfather's spiked eggnog when I was a boy. These days, you'll typically see eggs in use behind the bar only for cocktails that call for the albumen, or egg white, but there is a whole world of eggy cocktails beyond Whiskey Sours and Pisco Sours out there. In this post, we'll explore some of them and talk a bit about safely using eggs as well.

Why Use Eggs?

Eggs are used in cocktails to enhance flavor and texture. Egg yolks and whole eggs add richness and robustness as well as the flavor of the yolk to a cocktail. Egg whites add a silky, soft texture but don't contribute any flavor. If you're interested in testing out the difference an egg white makes, try making a Whiskey Sour with egg white and one without, and comparing them side by side. I promise you'll never go back to your eggless Whiskey Sour again.

Egg Cocktail Taxonomy

Egg cocktails are classified both by the part of the egg they use and also by the other ingredients found in the cocktail.

Flip
A flip is a cocktail that includes a whole egg and traditionally does not incorporate cream.

Eggnog
An eggnog is a cocktail that uses the whole egg and also includes cream. Although eggnogs historically spike the concoction with brandy or rum or both, a great many delectable nogs have been made using other spirits and liqueurs.

Sour
A sour is a cocktail that includes a base spirit, a sweetener, and a citrus juice. Sours may or may not include egg but when they do, only the white is typically used. A classic example is the Pisco Sour.

Fizz
A fizz is a variation on the sour that adds some sort of carbonation (soda, soda water or effervescent wine) to the mix. Fizzes are traditionally served without ice and may or may not include egg. Fizzes that do have eggs are classified by the part of the egg used. A silver fizz uses just the egg white, a golden fizz uses just the egg yolk, and a royal fizz uses both the white and the yolk. One of the more popular silver fizzes in the world is the Ramos Gin Fizz.

Using Eggs in Cocktails

Except for eggnogs, which I typically make in a blender, most egg cocktails are made directly in your shaking tins. I always add the egg to my tin first, that way if I mess up a separation, I don't waste my expensive booze. I then add the rest of the ingredients, in ascending order of cost.

The process of separating an egg is not difficult but if you've never done it, I would practice a few times at home before attempting it in front of a guest. Simply crack the egg on a sanitary surface and split the egg in half, holding the yolk in place in one of the halves. Let the majority of the albumen kind of sloosh over the sides of the shell into your shaker tin. If needed, you can pass the yolk back and forth between the two halves of the shell until all the white is in the tin but don't worry about getting it all; eggs are larger now than they were a hundred years ago when egg white cocktails came into being, a little bit of egg white goes a long way.

Most egg cocktails, whether you're using the whole egg or just the white, benefit from a process known as a dry shake by which you shake the cocktail without ice first to froth things up, then add ice and shake again. I've already explained dry shaking in detail here, so check out that post if you have questions. Once you shake the cocktail, strain it into your serving glass. I always double strain egg cocktails just in case a tiny piece of shell made it into my shaker tin somehow.

Garnishes with egg cocktails can be tricky, anything too heavy will break the surface of the foam you worked so hard to shake into existence, and lots of things just look kind of silly perched haphazardly on the side of the glass or floating on the foam. I'll usually opt for some citrus zest expressed over the top of the foam or some bitters arranged artfully in the foam.

After you serve the cocktail to your guest, make sure to wash and sanitize your tins thoroughly. Most states' health departments require this, so mine go through the dishwasher every time I make an egg cocktail. It makes sense, even though the 24 year old gentleman at the bar is ok eating raw egg in his Trinidad Sour, the 78 year old lady you serve next may not be. I keep an extra set of shaker tins on hand so that I'm not missing my eggy set while they're being washed. 

Finally, although this may seem obvious, aside from eggnog, eggs generally work better in cocktails that are shaken with citrus. I had a request for an egg white Old Fashioned the other day and had to turn it down. Gross!

Egg Safety

Although most articles about using raw eggs in cocktails will prominently display the following information at the beginning, I suppose to avoid potential lawsuits or something, I'm reluctant to even include it. After all, I'm assuming since you're reading this blog, that you are an intelligent person with a fair amount of common sense. You know that (in the US) eggs should be kept cold and you likely know about cross contamination and all that. You may even know about the extreme unlikeliness of an egg in the US containing salmonella. But, just in case you still have some lingering doubts, here are some facts and best practices.

In the 1990's the CDC estimated that 1 in 20,000 eggs was infected with salmonella 1, and I see this figure all over the place when people are talking about egg white cocktails, even though it's total bunk. For starters, I'm reluctant to believe any statistic which seems to be rounding to the nearest 10,000, but besides that, egg handling practices and testing of flocks have really improved since the 90's. These days, the FDA knows which flocks in the US are infected with salmonella and those eggs are diverted to pasteurization facilities or destroyed as the flock is culled of infected birds 2. Even in cases where a chicken is infected, the statistical likelihood that an egg laid by that chicken contains salmonella is 0.012% 3. And even in cases where an infected egg makes it through the safeguards, if it is kept below 40°F (4.4°C) the bacteria can't multiply. Given the low levels of salmonella bacteria present in infected but well-handled eggs, for the average person with an uncompromised immune system, the bacteria will likely cause no more than a brief bought of diarrhea. Across all Americans, including those who are in greater danger of having serious complications from salmonella, the odds of dying from salmonella are 0.0375% 4.

So, even with the worst case scenario numbers from the 90's of 1 egg in 20,000 being infected, the likelihood of dying from a raw egg cocktail is around 0.000001875%, roughly the same odds as dying from a falling coconut. I don't worry much about coconuts, and I don't worry about eggs.

That said, to ensure your eggs stay safe once you get them home, keep them chilled, handle them with clean hands, and crack them on a clean surface. Always consume cocktails made with raw eggs immediately. 

If you have a compromised immune system or just don't want to risk it, you can buy pasteurized eggs in the shell or boxes of pasteurized whites, yolks, or whole eggs. These tend not to froth up as much as fresh eggs do and they can have a bitter taste sometimes, but they work.

Cocktails with eggs are a joy to drink, so I hope you won't let the very unlikely threat of salmonella poisoning deter you from trying them at home. Happy mixing!

Notes

1, 4 CDC site on salmonella

2 Site that highlights news about the egg industry

3 New York Times article

Absinthe

There is perhaps no other spirit that has as much mystique, exaggeration, distortion, and misinformation surrounding it as absinthe. Long maligned as a hallucinogenic elixir, it was banned in the European Union and the United States for years, the only alcoholic beverage to be specifically outlawed after prohibition was repealed. As we'll learn in this post, absinthe doesn't deserve its bad rap. It's a delicious, highly complex spirit which is once again rising to prominence as a viable option for the imbibing public.

Definition and Production

Although there is no legal definition of absinthe in the United States, it is traditionally described as a high-proof (45-74% ABV) spirit distilled from a mixture of different botanicals. Historically, absinthe must include three primary botanicals: anise (star anise for lower quality absinthes and aniseed for the higher quality ones), fennel, and grand wormwood. It is this third ingredient, grand wormwood, latin designation, Artemisia absinthium, from which absinthe derives its name and it's undeserved reputation as a hallucinogenic drug. In addition to the trinity, most absinthes contain ten to twenty other herbs and botanicals that vary by brand and are typically closely guarded trade secrets.

Because it lacks a legal definition in most countries, the idea of what makes a botanical spirit a "true" absinthe is more of a question of convention and historicity than a set of laws. The production of true absinthe starts with column-distilled neutral grain or neutral grape spirit. The high-proof spirit is placed into a pot still with anise, fennel, wormwood, and lots of other macerated botanicals and allowed to steep for up to three days. Once the botanicals have infused into the spirit, the heat is turned up and the alcohol is redistilled, carrying with it many of the congeners that give absinthe its nuanced flavor.

Distillation is a key step for absinthe because of the long infusion time the herbs endure. During the infusion step, many of the botanicals impart very bitter compounds into the spirit, but because they typically have higher boiling points than some of the more desirable compounds, they do not transfer to the distilled hearts of the final product. Some producers will add a second infusion step after the primary distillation. The upshot is that absinthe is not only an infusion but a distillation. It can't be produced by simply macerating botanicals and steeping them in high proof spirit. If you've ever had a very bitter "absinthe", it probably wasn't distilled.

Unlike cognac or mezcal, absinthe doesn't have to be produced in a specific local, it can be distilled anywhere in the world. As long as it uses the botanical trinity and is bottled at a high enough proof, it can be considered a "true" absinthe. Also, true absinthe is not a liqueur but a spirit, meaning that it is not bottled with added sugar.

(Non)hallucinogenic Properties

Just to get the main point of misinformation out of the way first, absinthe does not contain, nor has it ever contained, any hallucinogenic compounds. Although thujone, a volatile organic oil imparted in low quantities by the grand wormwood in the distillate, is a neurotoxin, it is not hallucinogenic and at the levels found in a typical glass of absinthe, you would need to quickly drink around 73.7 gallons of absinthe to die of thujone poisoning. Not that it matters because you would have been dead of alcohol poisoning long before (by around the seventh, 1½ oz shot). And, if you somehow managed to survive the alcohol poisoning, since it only takes 5 liters (1.32 gallons) of water to die of hyponatremia (too little sodium in the blood) you would die of water poisoning before you died of thujone poisoning as well. In short, at the levels found in absinthe, water and ethanol are much more potent poisons than thujone 1.

The Tumultuous History of Absinthe

Although written evidence of wormwood-based medicines dates back to the Egyptians 2, the spirit we know today as absinthe can be traced back to a Dr. Pierre Ordinaire, a french doctor who settled in Switzerland after the French Revolution and who started selling a wormwood-and-anise-based cure-all circa 1792. It became quite popular and in response, Henri-Louis Pernod (founder of the now mega-conglomerate distiller and beverage distributor Pernod-Ricard) started distilling his own recipe for absinthe as well.

Absinthe became popular among Bohemians and artists in France but several historical events, including the use of absinthe as an anti-malarial for French soldiers abroad and the obliteration of the French wine industry by the grape phylloxera aphid, brought absinthe into mainstream consumption. 

It stayed popular until the mid-1800's when a complex array of forces contributed to its demise. First, several medical studies (now known to have been flawed) demonstrated that absinthe was a more dangerous spirit than others being consumed at the time. Second, the Pernod distillery in which absinthe was produced caught fire and was destroyed in 1901, severely limiting worldwide availability of the spirt. In addition, the temperance movement in France (the same movement that led to the misguided Eighteenth Amendment in the United States) sought to ban hard liquor outright. And finally, as the wine industry recovered from phylloxera and tried to regain its lost market share, it funded marketing campaigns that exploited the reports of absinthe's harmful effects and partnered with the temperance movement to encourage a ban on absinthe. Once hailed as a cure-all, absinthe was vilified as a toxic substance responsible for a wide range of ailments. Public opinion gradually began to sway and on August 28th, 1905 an event occurred that would seal absinthe's fate for nearly a hundred years.

On that afternoon, Jean Lanfray, a French laborer living in Switzerland, flew into a drunken rage after his wife refused to shine his shoes. After a heated argument, Lanfray grabbed a shotgun and murdered his wife, who was pregnant, and their two children. Despite the fact that in addition to 2 ounces of absinthe, Lanfray had also consumed seven glasses of wine, six glasses of cognac, one coffee with brandy, and two crème de menthes during lunch, his drunken madness was blamed solely on absinthe. The subsequent trial, conviction, and suicide of Lanfray received international attention and within three years of the incident Switzerland had banned the production and sale of absinthe. By 1914, nearly every European country and the United States had followed suit.

In the United States, the ban on absinthe was followed proximately by the ban on all alcohol. During the drought that was prohibition, the knowledge of the production process for absinthe was nearly lost forever but after prohibition was repealed in 1933, regulations were nonetheless left in place requiring spirits to be free of thujone derived from Artemesia 3. However, because the tests used to determine the presence of thujone in the 1930's had a margin of error of 10 parts per million (ppm), "thujone free", as defined by US law, did not (and still does not) mean "zero thujone". So, in the US, any spirit containing thujone derived from Artemesia is considered thujone free as long as it contains less than 10 ppm thujone.

In 2007, it was demonstrated to the relevant US agencies (primarily the FDA) that absinthe production naturally results in very low levels of thujone and that most pre-ban absinthes and contemporary absinthes being produced abroad, were in compliance with the < 10 ppm regulations. No laws changed, it was simply shown that absinthe was legal under current law, and the production, sale, and importation of absinthe resumed in the US.

How To Drink Absinthe

Many people's idea of the proper way to drink absinthe, encouraged by pop culture, is the so-called "Czech method" of lighting an absinthe-soaked sugar cube on fire. Although dramatic, it is in no way a traditional method of taking absinthe. It was popularized in the Czech republic in the late 90's as a marketing ploy to sell a horrible-tasting, vodka-based herb infusion they were erroneously calling absinthe. In most circumstances in which you may have seen a bartender light absinthe on fire, it probably wasn't a true absinthe. When drinking a high quality absinthe, the only thing lighting it on fire will contribute to the flavor is a burnt caramel taste that overpowers the exquisite flavors of the botanicals present.

The traditional way of drinking absinthe is the classic Absinthe Cocktail. To make it, simply pour an ounce of absinthe into a glass. Place a sugar cube on a fork or a slotted spoon across the rim of the glass and slowly pour three to five ounces4 of very cold water over the cube, letting it dissolve into the glass. Although it's certainly not necessary, many people will use an absinthe fountain or absinthe balancier to allow the ice water to drip into the absinthe slowly.

As the water drips into the absinthe, you will start to notice swirls of opalescent clouds forming in the clear spirit. What you're seeing is a chemical reaction occurring between the anethol, an ester derived from anise and fennel, and the cold water. The effect is called the louche (pronounced loosh), a French word that roughly translates as "turbidity". As water is added to the absinthe, the anethol, which acts as an oil not highly soluble in water, comes out of suspension and forms tiny droplets within the absinthe, scattering light and giving the beverage a milky white, cloudy appearance. The reaction between the anethol and the water is more than an interesting visual phenomenon though, in addition, the louche heightens the flavors and aromas in the drink. For this reason, I never recommend that people take absinthe as an undiluted shot. Dilution improves absinthe. Drink it fast if you want but always dilute it! Despite some marketing claims, the intensity of the louche is not necessarily a measure of a good absinthe. In fact, a thick, completely opaque louche probably indicates an overabundance of anise in the distillate which may contribute to an unbalanced flavor.

Once your drink is properly diluted, remove the spoon and enjoy. The anise will be present but it should be complemented by the other botanicals present, especially the wormwood. Because there are so many herbs and roots and other stuff in absinthe, the flavor is much more complex and nuanced than other anise-based distillates like ouzo or sambuca. I've had many people come into the bar where I work who aren't fans of the black licorice flavor of anise who still love absinthe. So, if you're interested, find a good, high quality bottle and give it a try. Santé!

Further Exploration

Although I covered a lot in this post. I only scratched the surface on the history, science and politics of this fascinating spirit. If you're interested in learning more, I recommend visiting the website of the Wormwood Society Absinthe Association and reading the blog of one of their principle contributors, Evan Camomile, a world renowned absinthe expert.

And, if you would like to try absinthe in a drink besides the classic Absinthe Cocktail. Check out the recipes page for a few great classics that use absinthe.

Notes

1 If you're interested in the technicalities, these figures assume an average human body weight of 62 kg (136.7 pounds) and an average thujone presence of 10 mg thujone per liter of absinthe (10 ppm). Lethal doses of all poisons are affected by body weight. People heavier than 62 kg would need to consume more of a specific poison to die of it than an average-weight person would. Toxicology figures are based on median lethal dose (LD50 ). LD50 is the dosage required to kill 50% of test subjects. Since it's generally considered bad form within the scientific community to test lethal dosage on human subjects, lethal dosages for humans are usually determined by testing on other animals and extrapolating.

The figures on the toxicity of absinthe referenced here come from a study carried out in 2000 by Hold, et al. The study found that the dosage required to kill 50% of test subjects (mice) was 45mg of thujone per kg of body weight. Extrapolating, we find that a 62 kg human would need to consume 2790 mg of thujone to reach LD50 . At 10 ppm, a person would need to ingest 279 liters (73.7 gallons) of absinthe to reach LD50 .

The baseline figures on the toxicity of ethanol and water come from this source and are reformatted to fit our assumptions of a 62 kg average human weight and an ABV of 60%.

2 Earliest known mention of wormwood as a medicinal herb is referenced in the Ebers Papyrus, c. 1550 BCE.

3 Interestingly, other thujone sources, such as sage, oregano, and juniper, are free from regulation. Only thujone derived from wormwood is regulated.

4 Many absinthe experts will toss around the 1 part absinthe to 3-5 parts water figure as a good starting point for optimal dilution but if you want, you can get much more precise. Obviously, personal tastes differ but most experts agree that absinthe should be consumed at 11-12% ABV. So the proper amount of dilution is dependent on the absinthe's ABV. To determine proper dilution use the equation:

Where β is the absinthe's bottled ABV expressed as a percentage, Δ is the desired dilution ABV expressed as a percentage, α is the amount of absinthe you will be diluting in ounces, and ω is the amount of water you should add in ounces. For example, if you want to dilute 1.5 ounces of absinthe that is bottled at 68% ABV to 11.5% ABV you would need 7.4 ounces of water, a ratio of 1 : 4.9.

Math! Probably not necessary, but interesting if you like to geek out about this stuff as much as I do.

Bartending Techniques Part 1: Measuring Out Your Ingredients

Properly measuring out your ingredients is an essential first step to creating great drinks. Most recipes for cocktails that you'll find in books and online are listed in terms of ounces and parts of ounces but some websites, especially those catering to cooks instead of bartenders will list ingredients by cups, tablespoons, and teaspoons. Whether you're using measuring spoons or a jigger, measuring out your ingredients isn't difficult but does require some attention to detail. Because the recipes on this site (and most you'll encounter) are listed in terms of liquid ounces, we are going to mostly talk about using your jigger, but if you don't have one, here is a handy table of conversions for you.

Conversion Chart1

1 barspoon....…….   1 teaspoon………..   ⅙ fluid oz………….    5 mL  
½ tablespoon.....    1½ teaspoons.....   ¼ fluid oz..............    7½ mL
1 tablespoon…....    3 teaspoons……..   ½ fluid oz………….    15 mL
1½ tablespoons.    4½ teaspoons.....   ¾ fluid oz.............    22½ mL
⅛ cup……………....    2 tablespoons…..   1 fluid oz…………...    30 mL

¼ cup……………....    4 tablespoons…..   2 fluid oz…………..    60 mL
⅓ cup……………....    5 tablespoons…..   2½ fluid oz……….    80 mL

½ cup……………....    8 tablespoons…..   4 fluid oz…………..    120 mL
⅔ cup……………....    10 tablespoons...   5 fluid oz…………..    160 mL
¾ cup……………....    12 tablespoons….   6 fluid oz…………..    180 mL
½ pint……………....    1 cup……………….....   16 tablespoons…    8 fluid oz………...    250 mL
1 pint………………...    2 cups…………….....   16 fluid oz………....   475 mL
1 quart……………...    2 pints…………….....   4 cups……………....    32 fluid oz……….    950 mL
1 gallon…………....    4 quarts………….....   8 pints……………....    16 cups…………….    128 fluid oz………..    3.8 liters

Using Your Jigger

Using your jigger isn't difficult and over time you'll get very fast at it, but first, take some time to get to know it. Know what any internal markings are indicating without having to look at the annotation and know the levels of commonly used measurements, even if they aren't specifically labeled on your jigger. For instance, if you're jigger doesn't have a marking for ¼ oz, pour a quarter ounce of water into it and memorize the level. It will be different for every jigger so it's god to pick a jigger you like and stick with it.

Before you pour a single ingredient, give some thought to the order in which you should add the ingredients to your shaking tin or stirring glass. Most recipes list the dominant alcoholic ingredient (the base) first, which makes sense when classifying recipes, but it's exactly opposite how you should generally work. A good best practice is to add your cheapest ingredients first. That way, if you make a mistake, you aren't wasting a bunch of expensive booze. This generally means adding sugars first, followed by citrus or cream, bitters, and then alcohol in ascending order of cost (this often, but not always, means adding the lowest volume alcohol first).

Another point to consider is the viscosity of the ingredients. Viscous ingredients have what's called holdback, the amount that stays stuck to the sides of the jigger when you pour. Some ingredients, like maple syrup have a high amount of holdback, others, like heavy cream, have some, and others, like vodka, have a negligible amount. You need to account for holdback in two ways. First, overpour beyond the recipe's given measurement slightly to account for the holdback. And second, consider adding your most viscous ingredient last or rinsing your jigger before measuring out another ingredient so that the measurement of your next ingredient after a highly viscous one isn't thrown off.

Many bartenders, especially those that use the hourglass-shaped jiggers, hold the jigger in their hand between their middle and pointer fingers or between their middle and ring fingers. This allows for easy manipulation back and fourth between the jigger shot and the pony shot, and if you have a steady hand, works quite well. I recommend, at least at first, that you place the jigger on a level surface so you can be sure of your pour. A slight tilt to a jigger held in the hand can throw a drink's proportions off.

Fill the jigger to the brim or to one of the internal measurements (if applicable). Unlike the accepted practice when reading scientific apparatus, the meniscus should be as level as possible, not concave, and it should not be convex either, meaning the pour should not be over the top of the jigger, held in place with the liquid's surface tension.

Once you've measured your liquid, dump it into your mixing tin or glass and measure the next ingredient. If measuring to an internal marking, like the 1/2 oz line in a 1 oz pony shot, it's perfectly acceptable to dump your second ingredient on top after measuring out your first; fill to the one ounce mark and pour both ingredients into your mixing vessel together. It saves a lot of time. 

I always rinse my jigger immediately after I'm done using it for a drink to ensure that the next substance measured won't be contaminated. You wouldn't want a $40 pour of single malt scotch to be adulterated by your well gin, for instance.

So that's it for jiggering, please let me know if you have any questions in the comments below. If you're following the lessons in order, the next one, on shaking your cocktails, can be found here. Happy mixing!

Notes

1 The volume of a "standard" barspoon can vary widely. Make sure you know what volume yours holds if you intend on using it for measuring.

Bartending Techniques Part 3: Short Shaking and Dry Shaking

You may be wondering why we need two separate posts to cover what is, after all, a fairly simple procedure. While the methods described in the previous post will be all you need for the vast majority of cocktails, some of the best cocktails out there, such as swizzles, flips, and egg white cocktails require a different take on the shake. This post will cover short shaking and dry shaking.

Short Shaking

There is nothing complex about a short shake, it's simply shaking your cocktail for much less time than normal with the goal of mixing and chilling without a lot of dilution. It's usually used for making cocktails that are served with crushed ice. As we discussed in the post on ice, speed of dilution is dependent on many factors but one of the main ones is the surface area of ice exposed to a higher temperature liquid. Crushed ice will dilute and chill a drink much more readily than a single giant ice ball will.

So when a cocktail served with crushed ice is shaken, you don't want it to be fully diluted in the shaker tin or it will be overdiluted by the time the glass gets to its intended imbiber. The solution is to shake the cocktail only briefly, around two to four seconds depending on the drink, the ice you are using, and your shaking method. I like to pack my shaker tin as full as possible with ice1 when I short shake, this allows the maximum amount of liquid to get into contact with the cold ice but also limits the amount of ice breakup that occurs because the ice doesn't have as much room to rattle around.

You are aiming to completely mix and homogenize the ingredients while providing a bit of chilling and very little (less than 50% complete) dilution. Once your short shake is finished, immediately strain it into the serving glass, pack with crushed ice and any other liquid ingredients you didn't have in the shaker tin (i.e. soda water), garnish, and serve.

I always short shake my swizzles, even though they don't technically call for it. I think shaking better incorporates ingredients than swizzling does. Some other cocktails that benefit from a short shake are the Mai Tai and the Kitty Hawk Express.

Dry Shaking

As we've discussed2, eggs and booze have a long history together. Egg yolk adds flavor and richness to cocktails, think egg nog or the New York Flip. Egg whites add a silky texture and frothy head to drinks, examples include the Pisco Sour and Trinidad Sour. Most, but not all, egg cocktails benefit from a procedure called the dry shake.

Dry shaking is shaking a flip or an egg white cocktail without ice. The purpose is to incorporate the ingredients and allow the proteins in the egg white to break down and do their work trapping air to create the smooth, velvety texture that egg cocktails are known for. The process takes time so dry shaking before adding ice keeps the drink from over-diluting. Dry shaking adds another step to the drink's preparation but you can shorten the shake time considerably by adding a wire whisk ball or the spring from an old Hawthorne Strainer to your shaker tin.

Scientifically speaking, there are some interesting things happening inside your shaking tin when you dry shake an egg white. If you're a baker and have ever made a meringue before, you know the result. Here, we're making an alcoholic meringue by shaking in a tin instead of whipping in a bowl. As you shake, the egg white becomes agitated, causing the proteins to break down and unravel, forming long strands that trap air bubbles. The citrus juice in the cocktail strengthens the molecular bonds between protein molecules allowing the trapped air bubbles to link up to form a stiff foam. The sugar in the cocktail also plays its part, increasing the viscosity of the water in the egg, which also encourages the foam to form.

A dry shake with a wire whisk ball need only last fifteen to thirty seconds, depending on your shaking method. After which you simply pack the tin with ice as you normally would and shake again to chill and dilute. The longer you dry shake, the stiffer your alcoholic meringue will be, but for most cocktails, you're not trying for a stiff foam but a velvety one, so no need to shake your arms off. The exception is the Ramos Gin Fizz, for this classic cocktail to work, a fairly stiff foam is needed. Even with my shaker ball, I routinely shake a Ramos Fizz for at least three minutes.

Short shaking and dry shaking are two simple additions to your arsenal of techniques that will help you make some of the best cocktails in the books with precision and perfection. Happy mixing!

Notes

1 Just a quick note to avoid any confusion, never shake with crushed ice. The drink is served with crushed ice but always shake with the densest, highest quality ice you have.

2 Check out this post to learn more about using eggs in cocktials.

Bartending Techniques Part 2: Shaking Cocktails

Shaking is the most common way of mixing and diluting cocktails. If you need help choosing a set of shaking tins, check out this post. Once you have your tins, using them is pretty straightforward. The only difficult part for some people is getting them separated but with a bit of practice you'll be cracking them apart in no time.

To use your shaker setup, first place your large shaker tin on the bar1 and measure your ingredients into it. Add ice. Place your smaller "cheater" tin, opening down, into the larger tin. You don't want the vertical axes of the tins aligned when you do this. Offset the axis of cheater tin from that of the larger tin. Basically, you want the wall of the cheater tin to rest against the lip of the larger tin. Holding the larger tin firmly to the bar with one hand, slam your palm down on the bottom of the cheater tin to firmly wedge it in place.

Now, pick it up and, with the smaller tin pointed toward yourself, shake it. Pointing the smaller tin toward you makes it less likely that you will spray cocktail all over the bar or, worse, your guests, if something should go wrong and the tins fall apart mid shake.

I've read a lot of articles over the years about "proper" shaking methodology but trust me, if anyone has ever told you the "right way" to shake a drink, it's bullshit. I guarantee you given the exact same recipe, temperature, and dilution level, no one is going to be able to tell the difference between two cocktails, one shaken with a vigorous, piston-like, back and forth motion, and another shaken with a "Japanese hard shake". One method may dilute the drink faster, for sure, but as long as you know that your method is giving you the proper dilution, you could put your tins in a paint shaker for all the difference it makes.

My shake time changes depending on the cocktail but I basically shake until after condensation starts forming on the outside of the shaker tins. I'll generally shake longer for cocktails served up without ice than those served over ice because cocktails served up need to be to the exact right dilution level when they hit the serving glass. Cocktails served over ice will continue to dilute in the glass. With my technique and lots of Kold-Draft ice, this usually means about six to ten seconds of very hard shaking. Since I'm making 500-600 drinks on a busy night (around 60% of which are shaken), a brief, forceful shake serves me well. I have fairly large hands so I find it easy to shake one handed and, therefore, to shake two cocktails at once, but if you're not comfortable with that, lots of bartenders prefer a two-handed shake as well (it's probably better for your shoulders in the long run anyway). Do what works for you.

Not to get too off track here but I'd like to share a little bit of the science behind what's happening when you shake a cocktail. Once you slam that cheater tin down on the large tin, you've formed a closed system with a fixed volume. The liquid and gas inside the tins at this point are in isolation from the air outside the tin. As you shake, the ice starts to melt and cool everything down, the melted water has a higher density than ice (and therefore has a lower volume) and as the liquid ingredients (alcohol, citrus, sugar, etc.) cool down, they also increase in density (decreasing in volume). The volumetric decrease in liquid and solid ingredients allows the air in the shaker to increase in volume, but because the system is closed and no new air molecules can be added, increasing the volume of air decreases the air pressure inside the tins. The negative pressure forms a vacuum, drawing the two tins together. This is one of the reasons why the tins don't fly apart when a bartender shakes one-handed and why the tins are difficult to pull apart. The guys over at Cooking Issues, who I really respect, have a much more in-depth explanation if you're interested. They also have a fascinating breakdown on how shaking chills your cocktail below the freezing point of ice (around -7°C), even though you start with ice at 0°C and ingredients at room temperature.

Okay, so you've got your drink cold and properly diluted, now comes the "hard" part, breaking the tins apart. Holding the bottom shaker tin firmly in your non-dominant hand, place your thumb over the point where the cheater tin touches the large tin and, using the meaty part of your dominant hand where the thumb meats your palm, hit the large tin firmly at a spot about an inch and a half away from where the two tins meet. You should hear a crack and the tins should break apart. Practice with empty tins, or shaken ice water until you get it.

Once you have the tins apart, strain the drink into your serving glass, rinse your tins, and drink up!

Notes

1 Some references will tell you to measure your cocktail into the smaller tin instead of the larger tin, and then pack it with ice. This way, they observe, you will never fill your tins past their capacity. While it's true that there is a danger of overfilling the larger tin—making it impossible to get the smaller tin on without spraying cocktail everywhere—over time you'll learn what your maximum capacity is and you won't overfill. I prefer to measure into the larger tin for two reasons. First, the smaller tin can usually hold only two cocktails worth of ingredients max, whereas the larger tin can hold three easily with room to spare. Also, because the tins are already oriented properly (with the smaller tin facing up, and therefore, toward you) measuring into the larger tins allows you to grab them off the bar and immediately start shaking without having to flip them around. This especially comes in handy when you are shaking two cocktails at once.

The Bartender's Kit Part 2: Mixing Vessels

Just like the world of ridiculous kitchen gadgets, the world of bartending tools is full of all kinds of useless items that may look neat/terrifying, but ultimately fail at making the process of mixing cocktails more efficient. In a large, busy, craft cocktail bar, the service well bartender will frequently be expected to build, shake or stir, and garnish an average of two to three drinks per minute for an entire eight-hour shift. The pros don’t have time to waste on gimmicks, they know the tools that work to make their job easier and more efficient. For this reason, the essential tools professional bartenders use vary little across bars. In this post, we’ll examine the different types of mixing vessels the pros use and explain why they use them. We’ll also give some examples of alternatives that are commonly marketed to the novice cocktail mixer and why you may want to steer clear of them. The first part of this post will focus on the most important tool in the bartender's arsenal, the shaker, and the second will highlight different options for stirring vessels. Deciding when to shake a drink and when to stir is covered in this other post.

Shaking Vessels

There are four types of shaker setups you can commonly buy but, in my opinion, three of them are stupid.
What not to buy: Cobbler Shakers, Parisian Shakers, and Boston Shakers

Cobbler Shakers
Cobbler Shakers are often billed as easier for novices to use than the other types but in my experience, that's not the case. This type of shaker is made of metal and consists of three pieces, a bottom, a perforated top that acts as a strainer, and a cap. The only place in the world they are commonly used is Japan because... Japan is unusual in a lot of ways. In the west, I rarely see these in use in a professional bar setting and when I do, I usually order a beer because the chances of getting a decent cocktail are somewhat worse than the odds of being struck by falling airplane debris.

Cobbler Shakers suck for several reasons. First, the internal vacuum created by shaking (discussed below) makes the tins very difficult to get apart without resorting to vice grips and over time and repeated use, the seal between the lower tin and the upper strainer becomes too loose or too tight either spraying your carefully measured cocktail all over the place or, once again making it difficult to get the tins apart. Also, the three-piece design takes more time to rinse between cocktails, the built in strainer is too small to quickly drain and doesn’t have a “gate” to help control the strain, and the cap is constantly getting misplaced, rendering the entire apparatus useless.

Parisian Shaker
The Parisian Shaker is sort of like a Cobbler Shaker without the cap and built-in strainer. Graceful-looking, all-metal affairs, the two tins fit snugly together to form a seal—at first. But these have the same issue that the Cobbler Shakers have, difficult to get apart after shaking and eventually the tins get warped and the seal becomes too loose.

Boston Shaker
Boston Shakers consist of a large metal bottom tin and a smaller “mixing” glass (usually a 16-oz, straight-sided pint glass). These are a viable alternative to my preferred shaker set but I dislike the glass used in the Boston Shaker for several reasons. First, it’s heavier than an all-metal tin setup, after shaking hundreds of cocktails in a night, this truly makes a difference with how a bartender's arms will feel the next day. Second, without getting into a lot of complex thermodynamics, the higher thermal mass of the glass absorbs more heat before it cools, so cocktails shaken with a Boston Shaker can taker longer to reach proper dilution than those shaken with an all-metal setup. Third, glass breaks; an accidental drop to the floor (or, worse, the ice well) stops service. The only benefit of the glass "tin" is that bartenders who free pour liquor and mixers can see the level of liquid in the glass before they add ice to ensure that they properly mixed the cocktail. Most professionals and home bartenders these days jigger everything though, so they don’t need a clear mixing glass to see the liquid level.

What to buy: a set of uninsulated, metal, weighted, mixing tins

Mixing Tins
The best shaker set is one that consists of two metal tins, the smaller "cheater" tin (usually 16–18 oz) replaces the mixing glass in the Boston Shaker setup and fits snugly into the larger tin (usually 26–30 oz) to form a tight seal. Unlike the Cobbler and Parisian Shakers, these tins actually fit together more tightly as the metal warps over time. The low thermal mass of the two metal tins cools cocktails quickly and efficiently. The metal tins won’t break; even under the most rigorous use, they will easily last a lifetime. And, as an added bonus, they are the least expensive of the options above. The weighted tins on this page and this page from barproducts.com are an excellent, low-cost, entry-level set I happily used for years and I’m currently using this set from Cocktail Kingdom and loving them. 

A side note, don't buy insulated shaker tins. I think these started as a gimmick and in recent years I've seen more and more bartenders using them. The insulation is designed to keep your hands warm, which it does; the only problem is that it also keeps your cocktail warm. Just like the heavy glass in the Boston shaker, the thermal mass of the insulation absorbs so much heat that it can take forever to chill your cocktail sufficiently. If you're a home bartender, your hands will warm back up in seconds and if you're shaking all night behind a busy bar, your hands just get used to it.

Stirring Vessels

Because stirring vessels aren't as specialized as shaker tins, there's quite a bit of variety in what people choose to use. I've seen lots of bartender's "stir" cocktails in pint glasses or cheater tins but I've found the conical shape and narrow bottoms of these vessels to be problematic for maintaining an efficient stir. Lots of bartenders these days are opting for specialized, cut-glass, Yarai-style, Japanese mixing glasses. These are beautiful and their straight sides make stirring a breeze. Several people in the bar I work for use this glass from Cocktail Kingdom and a few others I know use this cheaper one and they're very happy with it.

I don't use any of these though, instead I opt for 600 mL chemistry beakers. I can't take credit for the idea, the bar I work for has been using them since it opened but I love using beakers because they are made of durable, inert, break-resistant Pyrex glass and they have a much thinner base and side walls than the Japanese mixing glasses, once again resulting in a lower thermal mass that allows for faster chilling. The flat bottom and straight, groovless sides also make for easy stirring and the graduated markings make it easy to judge dilution levels. Plus, they're super cheap! People do look at me strangely sometimes when I whip out the chemistry set but I'll never go back to the Japanese glasses.

So that's my mixing vessels overview. Although I'm passionate about the products I've presented here, as I say on all my tool reviews, ultimately the right tool for you is the one you're most comfortable with, so if your mixing vessel choices aren't the same as mine and you're happy with them, that's great! Happy mixing!

The Bartender's Kit Part 1: Jiggers

I once had a fellow bartender, the best bartender I've ever known, in fact, tell me that making drinks was the least important part of his job. Obviously, good drinks are a pretty essential part of the profession, and his comment was a bit tongue-in-cheek, but his point is a valid one. He was driving at the idea that bartending is really about the people consuming the drinks, not the drinks themselves. And while I still believe he's right, it's only true once you've mastered the basics.

The first step to creating great cocktails is ensuring your drinks are properly built, meaning that they have the right proportions. And the best way to do that, especially at the beginning, is to use a measuring device called a jigger.

A Bit of History (Mythology)

The term jigger came about from the small tumbler that the Bosun on a ship used to issue the day's ration of rum. Because the sailors liked to complain that the amount was too little, they named the measuring device after the smallest mast on the ship, the jigger mast. It turns out that the measurement was approximately 1½ ounces and eventually, cups designed to serve exactly that amount came to be known as "jiggers". Smaller cups that served one ounce were known as "ponies". As time went on, a two-sided, hourglass-shaped cup, one side equipped with a "jigger shot" and the other with a "pony shot", came to be a standard part of the pre-prohibition barkeeps kit.

These days, a jigger is a generic term for any device used to measure booze and mixers for a drink and they needn't be 1½ ounces in volume. Many have different volumes and/or graduated markings inside the bowl to indicate different measurements, anything from an eighth of an ounce to three ounces.

To Jigger or Not To Jigger

If, like me, you read a lot of articles and blogs about the profession of bartending, you may be under the impression that this age old, sometimes divisive question is all but decided, and that no one in the industry ever free pours to measure their ingredients anymore. Vocal personalities within the industry have, in recent years, portrayed the free-pouring bartender as a wasteful, uncaring dullard not at all concerned with the consistency of her drinks or the happiness of her patrons. Others allow that free pouring is ok as long as the bartender is using a Boston Shaker with a transparent mixing glass so they can get a visual confirmation that their drink is at the right level once all the ingredients have been added. 

Although the characterization of the lazy bartender is sometimes true, it often isn't. I know many professional bartenders who free pour and have drinks that come out perfect every time. It isn't easy, for sure, different spirits and liqueurs and syrups all have different specific densities and pour at different rates. However, free pouring is a skill, that, like any other, can be honed and mastered.

That said, for the home bartender who isn't making hundreds of drinks every night or the pro just starting out, jiggering is absolutely the way to go. If you want to get to the point where you can free pour, I suggest that you count your pour every time you fill your jigger to get the hang of it. For a more detailed explanation on how to free pour, go here.

Selecting a Jigger

As the image above shows, there are a lot of different styles of jiggers on the market these days, some more practical than others. As I say before all my tool recommendations, ultimately the right jigger for you is what you're most comfortable with. But I will offer you some points to consider.

First, anything with a handle is out. The handle makes the jigger difficult to manipulate quickly and tends to get in the way of other things on the bar. I'm not sure why some jiggers have handles, I've never really been able to discern the purpose, I mean, it's not like the jigger is difficult to pick up without the handle. 

Next, a lot of jiggers are sold as a set. Many bartenders I know use such a system but I've found having more than one jigger on the bar to be more hassle than it's worth. I'm constantly grabbing the wrong jigger and having to peer at the measurement on the side to ensure I've got the right one. And they take up valuable space on your bartop. I've found that a single jigger with laser-etched (not printed) interior graduations marking other volumes to be the best option for me.

A final point of consideration is the shape of the jigger itself. A taller, thinner jigger is more accurate than a shorter, wider jigger. The reason is the difference in surface area at the lip or interior etching. An overpour in a jigger with a large surface area will be off by a greater margin than an overpour in a jigger with a smaller surface area. In some jiggers, a tiny overpour will result in a measurement that's off by a quarter ounce or more, which can significantly alter the drink and also cost you or your bar lots of money.

Nearly every bartender I currently work with uses this jigger and loves it. I used it for a while and found that over time, the printed interior graduations wore away until they were barely readable but it's probably a great option for home use. I really like this one from Cocktail Kingdom (as you'll find, I like a lot of their stuff). Since I use my jigger every day, I opted for the more resilient stainless steel model but if you're willing to hand wash your tools, their gold-plated and copper-plated options are beautiful too.

A Brief Overview on Making Cocktails

So you’ve been down to your local craft cocktail joint and discovered that there is more to life than Jack and Coke and PBR. But $10 for a cocktail is ridiculous! You can do it for way cheaper at home, right? Yes, you can! And…no you can’t. As we’ll see, the true cost of a home bar where you can make cocktails like the tavern makes them is not as inexpensive as it may seem at first. However, if you have a specific cocktail (or two, or five) that you love, keeping the ingredients on hand for a limited selection of drinks is usually cheaper than buying them at the local watering hole.

But that’s not really the point, is it? I mean, we’ll get to the cost of things in a future post, but really, you’re just interested in making cocktails, right? Yes? Then let’s get started.

This is a high-level overview meant to convey the most basic and essential information on mixing cocktails. It’s a great way to get your feet wet but along the way, I’ll link to other articles that discuss each of these topics in more depth. This will also be a slightly longer post than most of the essays on this site will be because it’s going to cover a lot of information. If you want to jump to a specific topic, the links in the following paragraph will convey you to sections further down in this post. Links in subsequent paragraphs will take you to posts that discuss a given topic in more detail.

First, we are going to discuss the essential tools you’ll need to mix your drinks. Then we’ll briefly cover some notes on glassware. Follow that up with some suggestions on ingredients and some instruction on basic bartending techniques. And finally, a few notes on flavor matching and proportions. You’ll be creating world class drinks in no time!

The Tools

The basic tools you’ll need to mix drinks are, fortunately, fairly limited and relatively inexpensive. You’ll need something with which to measure out your ingredients; a set of measuring spoons will work but a jigger is the preferred method. Also, something in which to chill and dilute your mixture; typically a good set of shaker tins and a mixing glass of some sort. You’ll need something to separate the cocktail from the ice; a Hawthorne Strainer and/or a Julep Strainer and a fine-mesh strainer will be sufficient. A barspoon, a decent citrus juicer, a couple of different peelers (a y-peeler for citrus peels and a channel peeler for citrus twists) and a muddler round out the list. I would also recommend having on hand a waiter’s corkscrew that can open capped bottles and, if you are working professionally behind an actual bar, a church key that can remove pour spouts.

The Glassware

There are several types of specialty glasses cocktail bars will typically use to serve drinks. Although most home bars won’t have such a selection, we’ll still run through the basics quickly so you’re aware of them. Glassware needn’t be fancy nor expensive. Utilitarian glassware that will stand up to some abuse is the best option here. I find items made by Libby to be both durable and good-looking.

Beer Glasses
Pint glass and Belgian beer glass: although a great many specialty beer glasses exist, you should really only need two types, a 16 oz pint glass (either straight-sided or Pilsner-shaped) for lagers and lighter beers and a 13 oz Belgian beer glass (or a Bel glass, as most bars call them for short) for more aromatic and higher ABV specialty craft brews.

Tumblers
Old Fashioned glass (also called a rocks glass and, in some bars, a highball): this glass is used to hold all manner of chilled cocktails served over ice and, frequently, spirits served by themselves neat or on the rocks.

Collins glass: this chimney-style glass is typically used for cocktails which include an effervescent mixer (e.g. soda water, Coke, ginger ale, etc.).

Stemware
Cocktail glass (also called a martini glass) and Coupe: used to hold chilled drinks that are served without ice.

Red wine glass, white wine glass, champagne flute: used to serve the appropriate type of wine.

Tulip glass: used to serve aperitivos, digestivos, port, and cordials.

Miscellaneous Glasses
Julep Cup: metal cup used to serve Mint Juleps and other smashes. At home, I use mine for Moscow Mules too.

Brandy snifter: although technically stemware, the purpose of this brandy and cognac glass is opposite that of most stemware. The low stem allows the hand to cup the drink from beneath, thereby warming it.

Shot glass: designed to hold a variety of “shot” volumes, shot glasses that hold up to two ounces are the most functional. These allow service of straight 1.5 oz spirit shots and mixed shots that might have higher volumes.

Wine carafe: holds a specified amount of wine (usually 6.5 oz) for wine service. You usually only find these in a bar or restaurant situation, not needed for home use.

The Ingredients

The adage “You get out what you put in” is true in life and even more true in cocktails. Choosing fresh, high-quality ingredients is essential if you want to produce excellent drinks. Although the definition of a cocktail has changed over time, most these days include ice, spirits or liqueurs or both, some type of sweetener, bitters, citrus or another mixer like Bloody Mary mix or cream, and a garnish. Let’s walk through them all briefly.

Ice
Most craft cocktail bars these days employ three different types of ice, 1¼-inch cube ice (i.e. Kold-Draft), crushed or pellet ice, and carved or molded ice balls. Home bartenders that don’t have access to these specialty types of ice should opt for store-bought ice (the larger the cubes the better). Home freezer ice can sometimes harbor flavors of the food stored in the freezer and can contribute unwanted flavors to your drinks. Cracking larger cubes into smaller chunks with a muddler can give you crushed ice without having to buy it separately.

Spirits and liqueurs
A spirit is an alcoholic beverage distilled from a fermented mixture of some sort. Liqueurs are spirits that have other stuff added to them after the distillation process like sugar, juice, cream, etc. Spirits and liqueurs are the foundation of your cocktail. The dominant alcoholic ingredient is called the base (cocktails with more than one spirit or liqueur in nearly equal measures can be said to have a split base). Obviously, the better your alcoholic ingredient tastes, the better the cocktail will taste, but use sound judgement when deciding. A spirit-forward cocktail like a Sazerac will benefit from an excellent rye whiskey but that same rye used in a whiskey coke would be wasted. In that situation use a cheaper, but still high quality whiskey.

The home bar should have a decent well lineup that includes all the basic spirits and a few classic liqueurs. In general, your well spirits should be a delicious middle-of-the road choice that is distilled with expertise and attention to detail without breaking the bank. I've included some options for well spirits below.

A few notes. With the spirits, my preferred choice is listed first. I didn't include any Canadian Whiskey on this list because, in general, it's not necessary in a home bar; a high quality bourbon can always replace a Canadian Whiskey and, in my opinion, the cocktail will be better off for it. With respect to the vermouths, the two options listed under dry vermouths are extremely different in flavor, as are those in the sweet vermouth category. If you're unsure about what type of vermouth to choose, go here for some reviews on the different flavor profiles on dry and sweet vermouths and choose one that suits you. With the liqueurs, amari, and herbal options, there is no need to stock everything. If you have all of them, you'll be able to make nearly any classic cocktail, but what you stock in your home bar is obviously completely up to your personal preference and what you'll be making most often.

Bourbon: Old Forester, Buffalo Trace
Rye: Rittenhouse, Old Overholt
Irish Whiskey: Jamison, Tullamore Dew
Scotch: Chivas Regal, Laphroig Single Malt
Brandy: Maison Rouge, Remy Martin VS
Aged Rum: Zaya, Parce 8 Year
Silver Rum: Ron Matusalem, Flor de Caña 4 Year
Tequila: Exotico, Espolón, Chamucos (reposado)
Mezcal: Del Maguey Vida, Sombra
Gin: Monopolowa, New Amsterdam
Vodka: Finlandia, Smirnoff
Triple Sec: Pierre Ferrand Dry Curacao, Cointreau
Dry Vermouth: Dolin Dry, Cochi Americano
Sweet Vermouth: Carpano Antica, Punt e Mes
Liqueur: Kahlua, Frangelico, Amaretto Lazzaroni, Coole Swan Irish Cream, Creme de Cacao, Creme de Menthe, Chambord, Creme de Casis, St. Germaine, Drambuie, Luxardo Maraschino, Domaine de Canton, 
Amari: Campari, Aperol, Averna, Cynar, Fernet-Branca
Herbal: Green Chartreuse, Creme de Violet, Benedectine, Galliano L'Autentico, Pernod Absinthe

Sweeteners
The sweetening agent in a cocktail isn’t always a syrup, it is often a sweeter liqueur such as Luxardo Maraschino Liqueur or Chartreuse, but the sweetening agent called for in many classics is simple syrup, a 1:1 ratio (by weight) of white sugar and water. Often, changing up the sweetening agent makes for a more interesting cocktail. The display of dozens of syrup “cheater” bottles on the bar top has become a common sight in craft cocktail bars across the nation. In addition to other types of sweetener syrups (house-made grenadine, honey syrup, demerara syrup) bars will have several specialty syrups they produce (sugar water infused with rosemary, saffron, vanilla bean, etc.). Your imagination is the limit but for the home bar it’s nice to have a few homemade syrups on hand. I recommend at least a 1:1 simple syrup, a 1:1 honey syrup, and a 1:1 demerara syrup (or turbinado if you can’t find demerara). Make them in small batches and keep them in the fridge so they don’t spoil before you use them.

Bitters
Gone are the days when the only bitters to be found behind the bar was a dusty bottle of Angostura. The process of making bitters is actually pretty easy, and as a result, there has been a flood of “craft” bitters coming to market in the past few years. It’s fun to experiment with them but they can be pricey. I recommend that your home bar has, at the very least, a bottle of Angostura bitters, a bottle of Peychaud’s bitters, and a bottle of orange bitters (Regans' makes a good one). This will allow you to make most classic cocktails. If you want to experiment a bit, rounding out your collection with bottles of vanilla, peach, grapefruit, and lemon bitters will add interesting twists to your concoctions.

Mixers (Citrus, Cream, Sodas, Eggs, Other)
The original definition of a cocktail only included: spirit, water, sweetener, and bitters. Anything else wasn’t a cocktail, it was a smash or a shrub or flip or a fizz, etc. Over time, most of these classifications fell away and anything that was a mixture of booze and “other stuff” became known as a cocktail. That “other stuff” can include a lot of different things. One of the most common additional ingredients is fruit juice, and I can tell you from lots of personal experience, nothing ruins a cocktail faster than processed, pasteurized, store-bought juice. Always fresh squeeze your juice. Yes, it’s more expensive, but it’s not nearly as expensive as the booze you’ll be ruining with gross juice. We’ll cover other mixers in more detail in future posts but I’ll just say before we move on to always include the best mixers you can afford: organic eggs and cream, sodas with real sugar, soda water with heavy carbonation, excellent Bloody Mary mix, etc.

Garnishes
It doesn’t happen as often as it used to but whenever I go into a cocktail bar and have an elaborate garnish in my drink, I immediately wonder if the bartender is trying to make up for a sub-par concoction with some fancy eye candy. A garnish should definitely add visual interest to the drink but much more importantly, it should contribute to either the taste or aroma (or both) of the cocktail in a way that makes sense. A simple orange or lemon swath with the citrus oils expressed over the surface of the drink and rim of the glass goes a lot farther than a fancy carved citrus peel that is too delicate to express the oils from. Use your own discretion but in my opinion, simpler garnishes that enhance the flavor of the cocktail are better than those that don’t.

The Techniques

Mechanically, the techniques used to mix cocktails are pretty straightforward, and while it may take time for you to be proficient at it, the essential concepts can be grasped in just a couple of minutes. There are four basic steps to making a single cocktail (when making multiple, different cocktails at once there are a few other things to consider but we’ll get to that in a future post).

The first step is to chill your glassware, I do this with pellet ice but if you have fridge or freezer space that works too.

Second, combine the ingredients in your mixing container. This could be your shaker tin, your mixing glass, or the serving glass itself. Although there are lots of professional bartenders who can count out their pours and make a perfect cocktail every time, I recommend that home bartenders (and newbies working professionally) jigger everything. Also, investing in high quality speed pourers will make dispensing your precious booze precisely much easier, and you’ll waste a lot less.

Third, mix the cocktail. In general, there are four ways to mix a drink: building, stirring, rolling, and shaking. A cocktail is built when the ingredients are simply poured into the glass together; this works best with an effervescent mixer, i.e. Coca Cola in a bourbon and Coke. A cocktail is typically stirred when clarity is desired in the final result, usually when the ingredients are limited to spirits, sugar, and bitters, i.e. the Old Fashioned and the Manhattan. Rolling is a seldom­ employed technique used when low levels of dilution are desired or when shaking will introduce too much air, i.e. the Bloody Mary. Basically, the ingredients are sloshed gently, with ice, from one mixing tin to another. Shaking is generally reserved for drinks with citrus, cream, or egg whites, i.e. the Aviation, the Dirty Bird, and the Pisco Sour. The vigorous action of shaking emulsifies and homogenizes ingredients that would otherwise separate into layers.

Finally, if the cocktail wasn’t built in the glass it will be served in, strain it into your chilled serving glass and garnish it. That’s it, you’re done! Drink and enjoy.

Cocktail Creation

Once you have the basics mechanics of bartending down, and you’ve developed a home bar with a few more liquor options than the absolute essentials (it will happen over time, trust me) you may want to try your hand at creating your own cocktails. A good place to start is to take a classic, say, the Mojito, and introduce a different base spirit say, Mezcal, we’ll call it the Mezquito. Tequila, mezcal, and rum all work well with lime and mint so it’s an easy (and delicious) substitution. This method helps introduce you to new spirits and flavor combinations. After a while, you’ll start to figure out what works well together and be more adventurous with your concoctions.

There are two things I take into account every time I put together a new cocktail (which, in the bar I work for, happens nearly every night): flavor matching and balance. I take what I know from my past experience about what flavors tend to work well together and add one or two variations to the mix, a different bittering agent or sweetener, or a different split base, a different citrus, etc. Then, when I have decided what ingredients to use, I strive for a balance of sweetness, bitterness, tartness (sometimes) and spirit base to make the drink work.

I realize, if this is your first foray into drink creation, these may seem like somewhat nebulous concepts so I’ll give you a real world example to make things a bit more concrete and then conclude this (very long) post.

The other day a guest asked for a spicy, gin-based cocktail. There are a lot of routes I could have taken but based on what she’d had (and liked) previously, I decided to go floral and citrusy. I decided to base the cocktail on a classic called the Aviation which is composed of gin, maraschino liqueur, creme de violet, and lemon juice. I decided to change the maraschino liqueur to elderflower to increase the floral nature of the drink, add some orange bitters and a couple drops of some extremely spicy house-made habanero-infused tequila, and top the drink with Sprite.

I knew the flavors would work together because of past experience and my familiarity with the Aviation so all I had left was to ensure the drink was balanced.

The first few times you try to balance a cocktail it’s a lot of trial and error but over time, as you get more familiar with the ingredients you’ll be more confident in your ratios. That said, I still taste as I go along and adjust on the fly if need be.

So I added everything except the Sprite to my shaker tin and increased the amount of lemon juice over what the Aviation calls for to counteract the added sweetness of the soda and elderflower liqueur. I shook it with Kold-Draft, strained it into a Collins glass, added some pellet ice, and topped it off with Sprite. I called it the Kitty Hawk Express as an homage to its foundation, the Aviation, and finished it off with an orange twist. She loved it, which was a pretty good feeling.

These moments of success, of having a happy guest love your creation, are what hospitality and bartending are all about. Everything else, the mechanics, the product knowledge, the creation process, is merely the groundwork for the ultimate goal of a satisfied you if you’re making cocktails at home or a satisfied guest if you’re behind a working bar.

I hope this overview has given you a taste for bartending. If you want to explore further click any of the links in this post.

If you are reading the lessons in order, click here for the next one, on measuring, or here to see the lessons landing page. Happy mixing!

Welcome to the Bartender’s Handshake

There is a drink. A dark, viscous, bitter drink. An amaro. A fernet. It is a drink, that, when ordered as a shot, instantly makes one recognizable as someone who works in the beverage hospitality industry. It is Fernet-Branca, and it is the Bartender’s Handshake.

Just as a knowledge of and appreciation for Fernet-Branca will allow industry outsiders to step, honorarily, behind the scenes of this age-old profession, this blog aims to allow you, the craft cocktail enthusiast or aspiring bartender, to gain insight into how the pros make great drinks. The goal is to make information on things like amari, small-batch whiskey, international-style gins, terroir-infused mezcals and everything else in this amazing cocktail renaissance sweeping the world more accessible to everyone.

Along the way, we’ll showcase the tools and methods that bartenders use to make outstanding cocktails, discuss some history, some mythology (most cocktail history is mythology, after all), review a few classic recipes that highlight particular techniques as well as some of my own recipes that highlight particular flavors. We’ll talk about what makes a great drink great, and how you, the home cocktail enthusiast or future professional, can use that knowledge to make better drinks.

So have a seat at the bar, pour yourself a shot of Fernet, and enjoy your time at the Bartender’s Handshake!

Here are some links to get you started:

If you just want to take a look at what's new on the blog, click here.

To get some pointers on how to bartend, go here for a brief overview on how to make drinks and here for some in-depth bartending lessons.

If you want to learn more about the booze that's in your drinks, go here.

If you want to learn about some specific cocktails, here are some recipes to chose from.

If you've found the information on this site helpful and want to donate to help fund further content creation, you can do so here. Thanks!

And finally, contact us here.